I'm a wife, stay-at-home mom, crafter, and blogger living in rural New England. As seen in Martha Stewart Living, Food Network Magazine, and more! | Tutorials, DIY, crafts, parenting tips, recipes, money saving tips, product reviews, local product features, New England living, intentional living, and more! |
‘Tis the season of Yankee Swaps! (Being from New England, we call them Yankee Swaps but most parts of the USA call them White Elephant Gift Exchanges.) Yankee Swaps are always a fun time and joke gifts usually rein. That said, it can be hard to decide what to bring as your gift so here are a variety of affordable gift ideas, ranging from funny to nice to extra cheap/free, all broken down into categories for easy shopping (I will keep adding to this list as I think of more). | This post contains affiliate links |
The first thing to consider before you choose your gift is your audience… is this a professional work party? Then you might not want to bring the toilet coffee mug.. however if the party goers have a sense of humor then silly gifts may win the night! Also consider if there’s an inside joke you can play up - for example one year at our work party someone wrapped and gave the dead houseplant that had been sitting in the breakroom for months! Now that was a clever and funny gift idea.
Funny and Silly (Joke) Gift Ideas
Framed photo of yourself - preferrably in the dramatic, cheesy department store photoshoot style
Burrito Blanket - Not going to lie, I kind of want one of these! haha
Bean Boozled Game - This is a funny game: spin the spinner, take a jelly bean... is that yellow speckled jelly bean buttered popcorn flavored or ear wax flavored? You won't know until you try it!
A Rotisserie Chicken (and a side) - this one is so unexpected it's bound to get a laugh. Just make sure you buy it right before the party and maybe put it on ice packs so it doesn't go bad.
Practical and Nice Gift Ideas
Lottery tickets/Scratch off tickets - everyone dreams of winning big!
Happy Earth Day! Today we stopped by the garden center to pick up some lavender plants for our deck. Lavender not only smells and looks beautiful but it can help as a natural bug repellent. Win-win!
I’ve also updated my Amazon Storefront to include a list of “Green Living” products and ideas to help you live like it’s Earth Day every day - because it is!
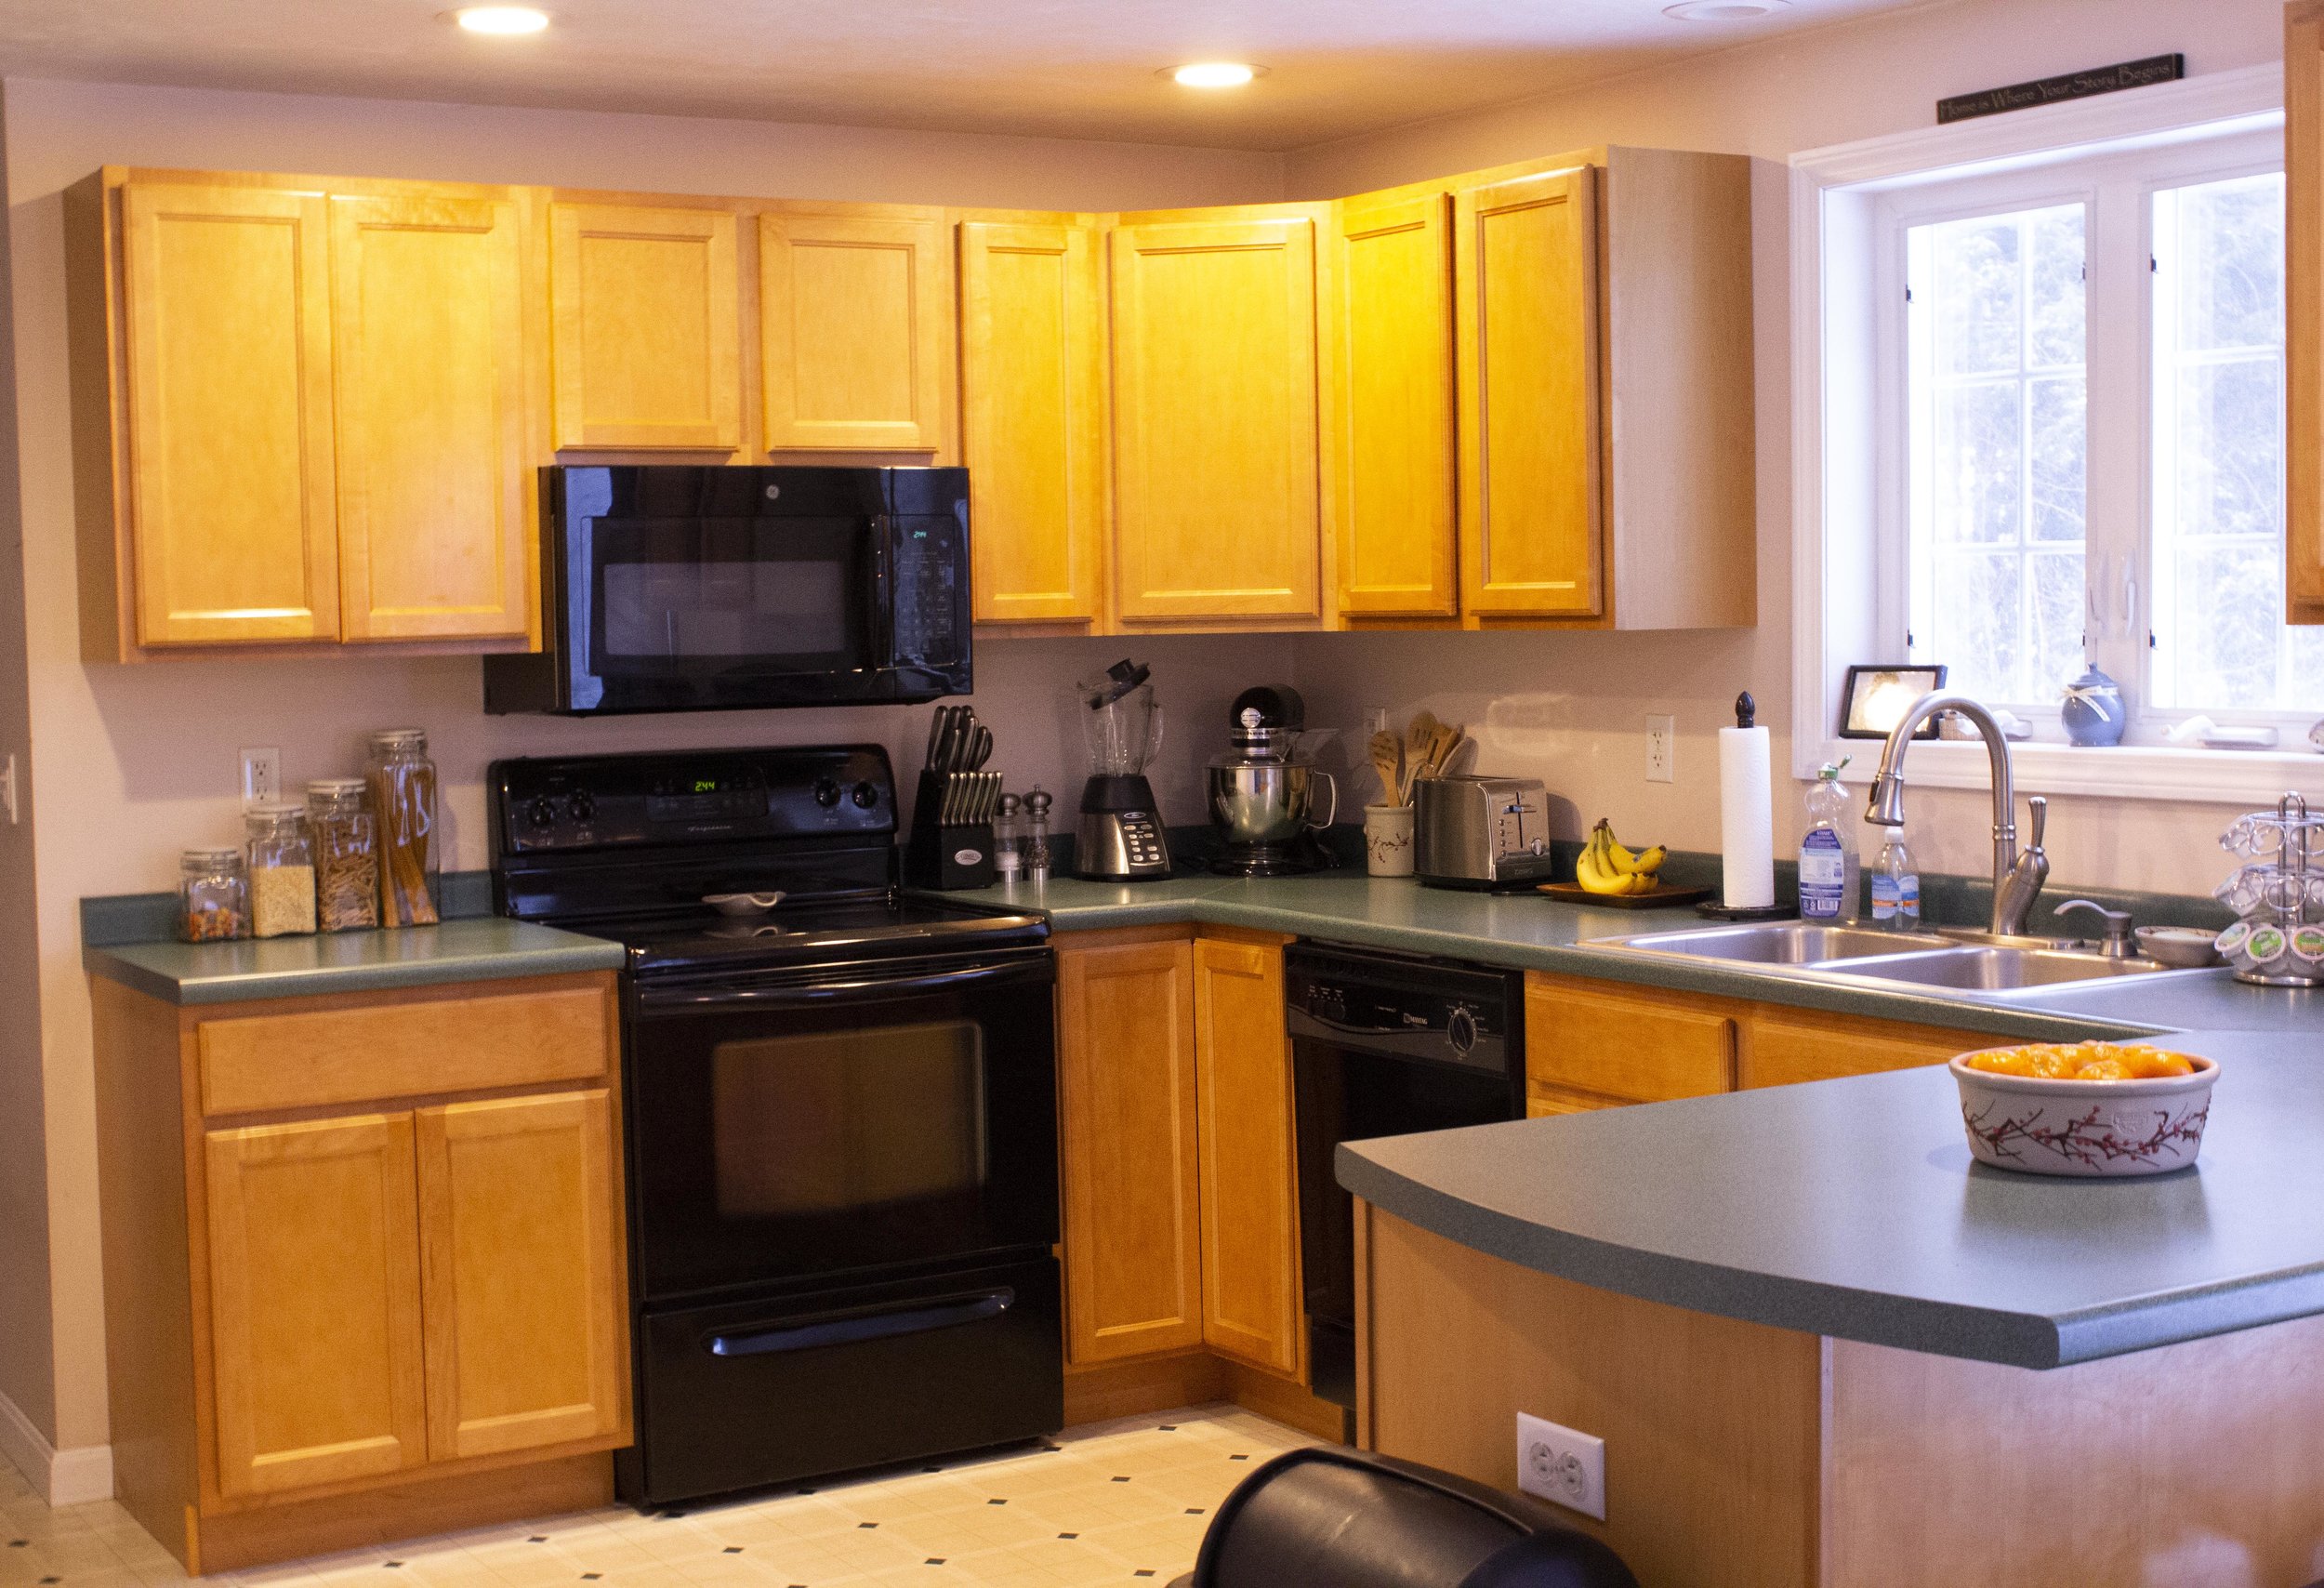
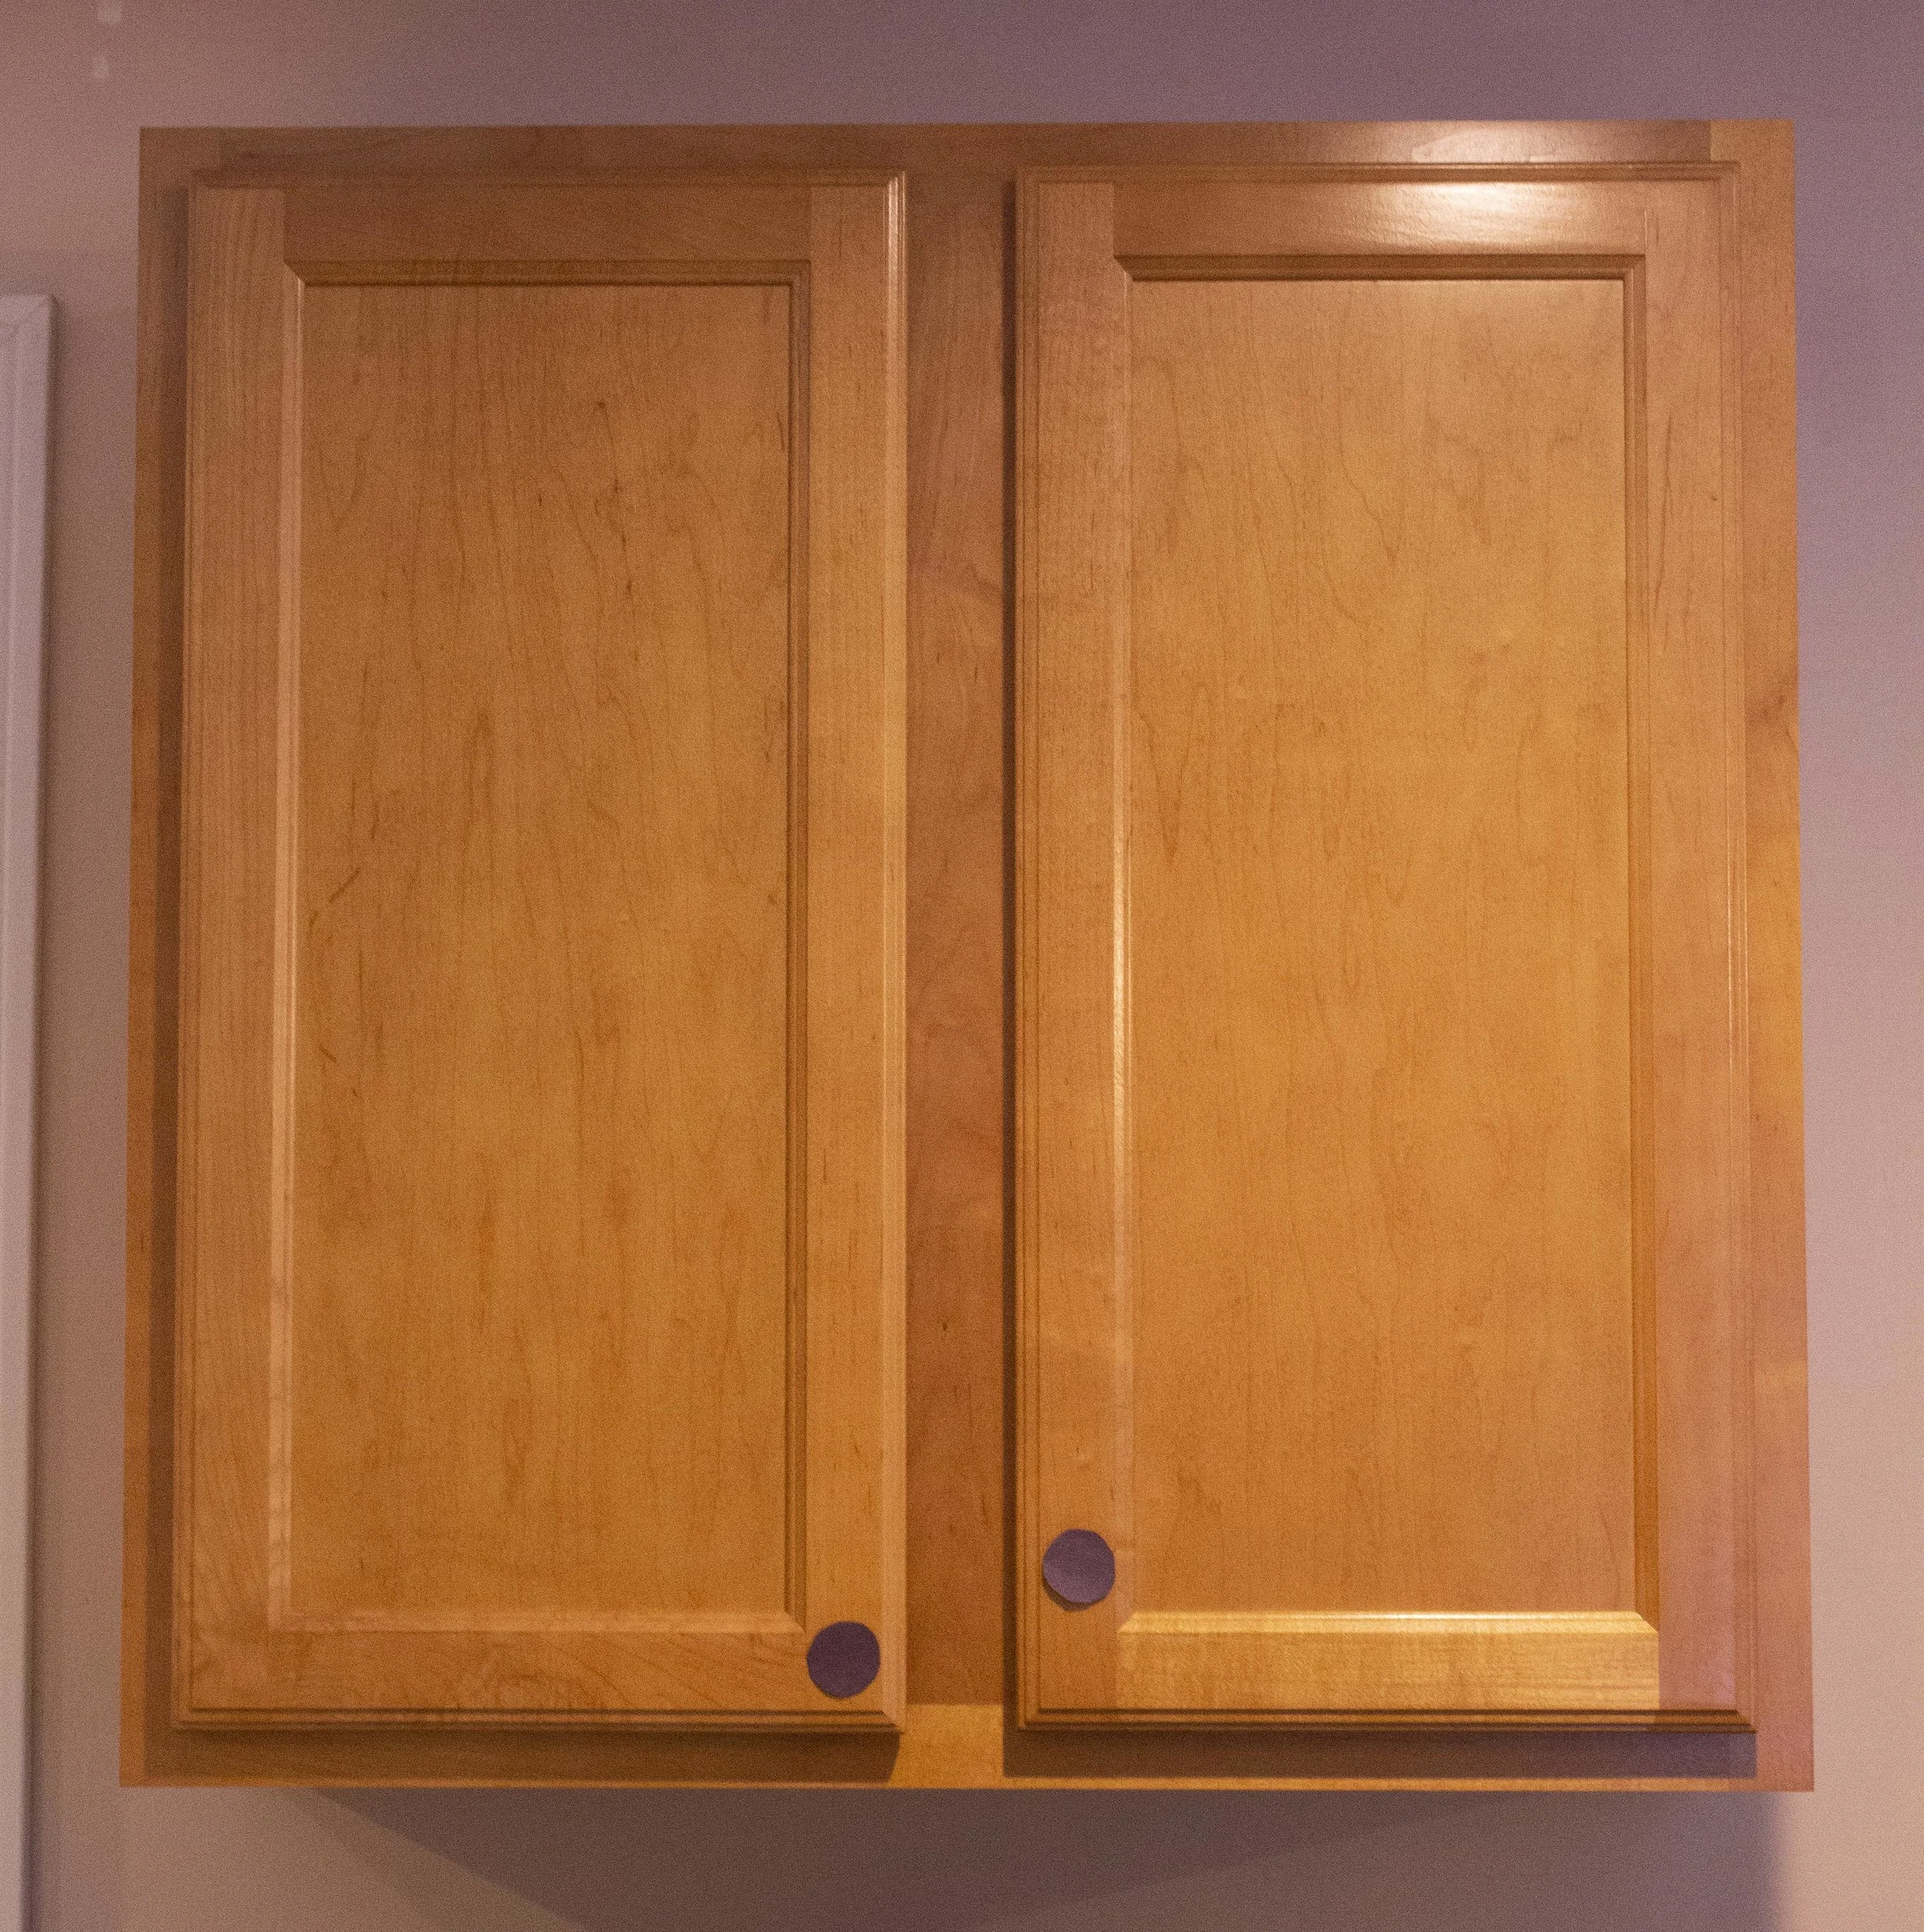
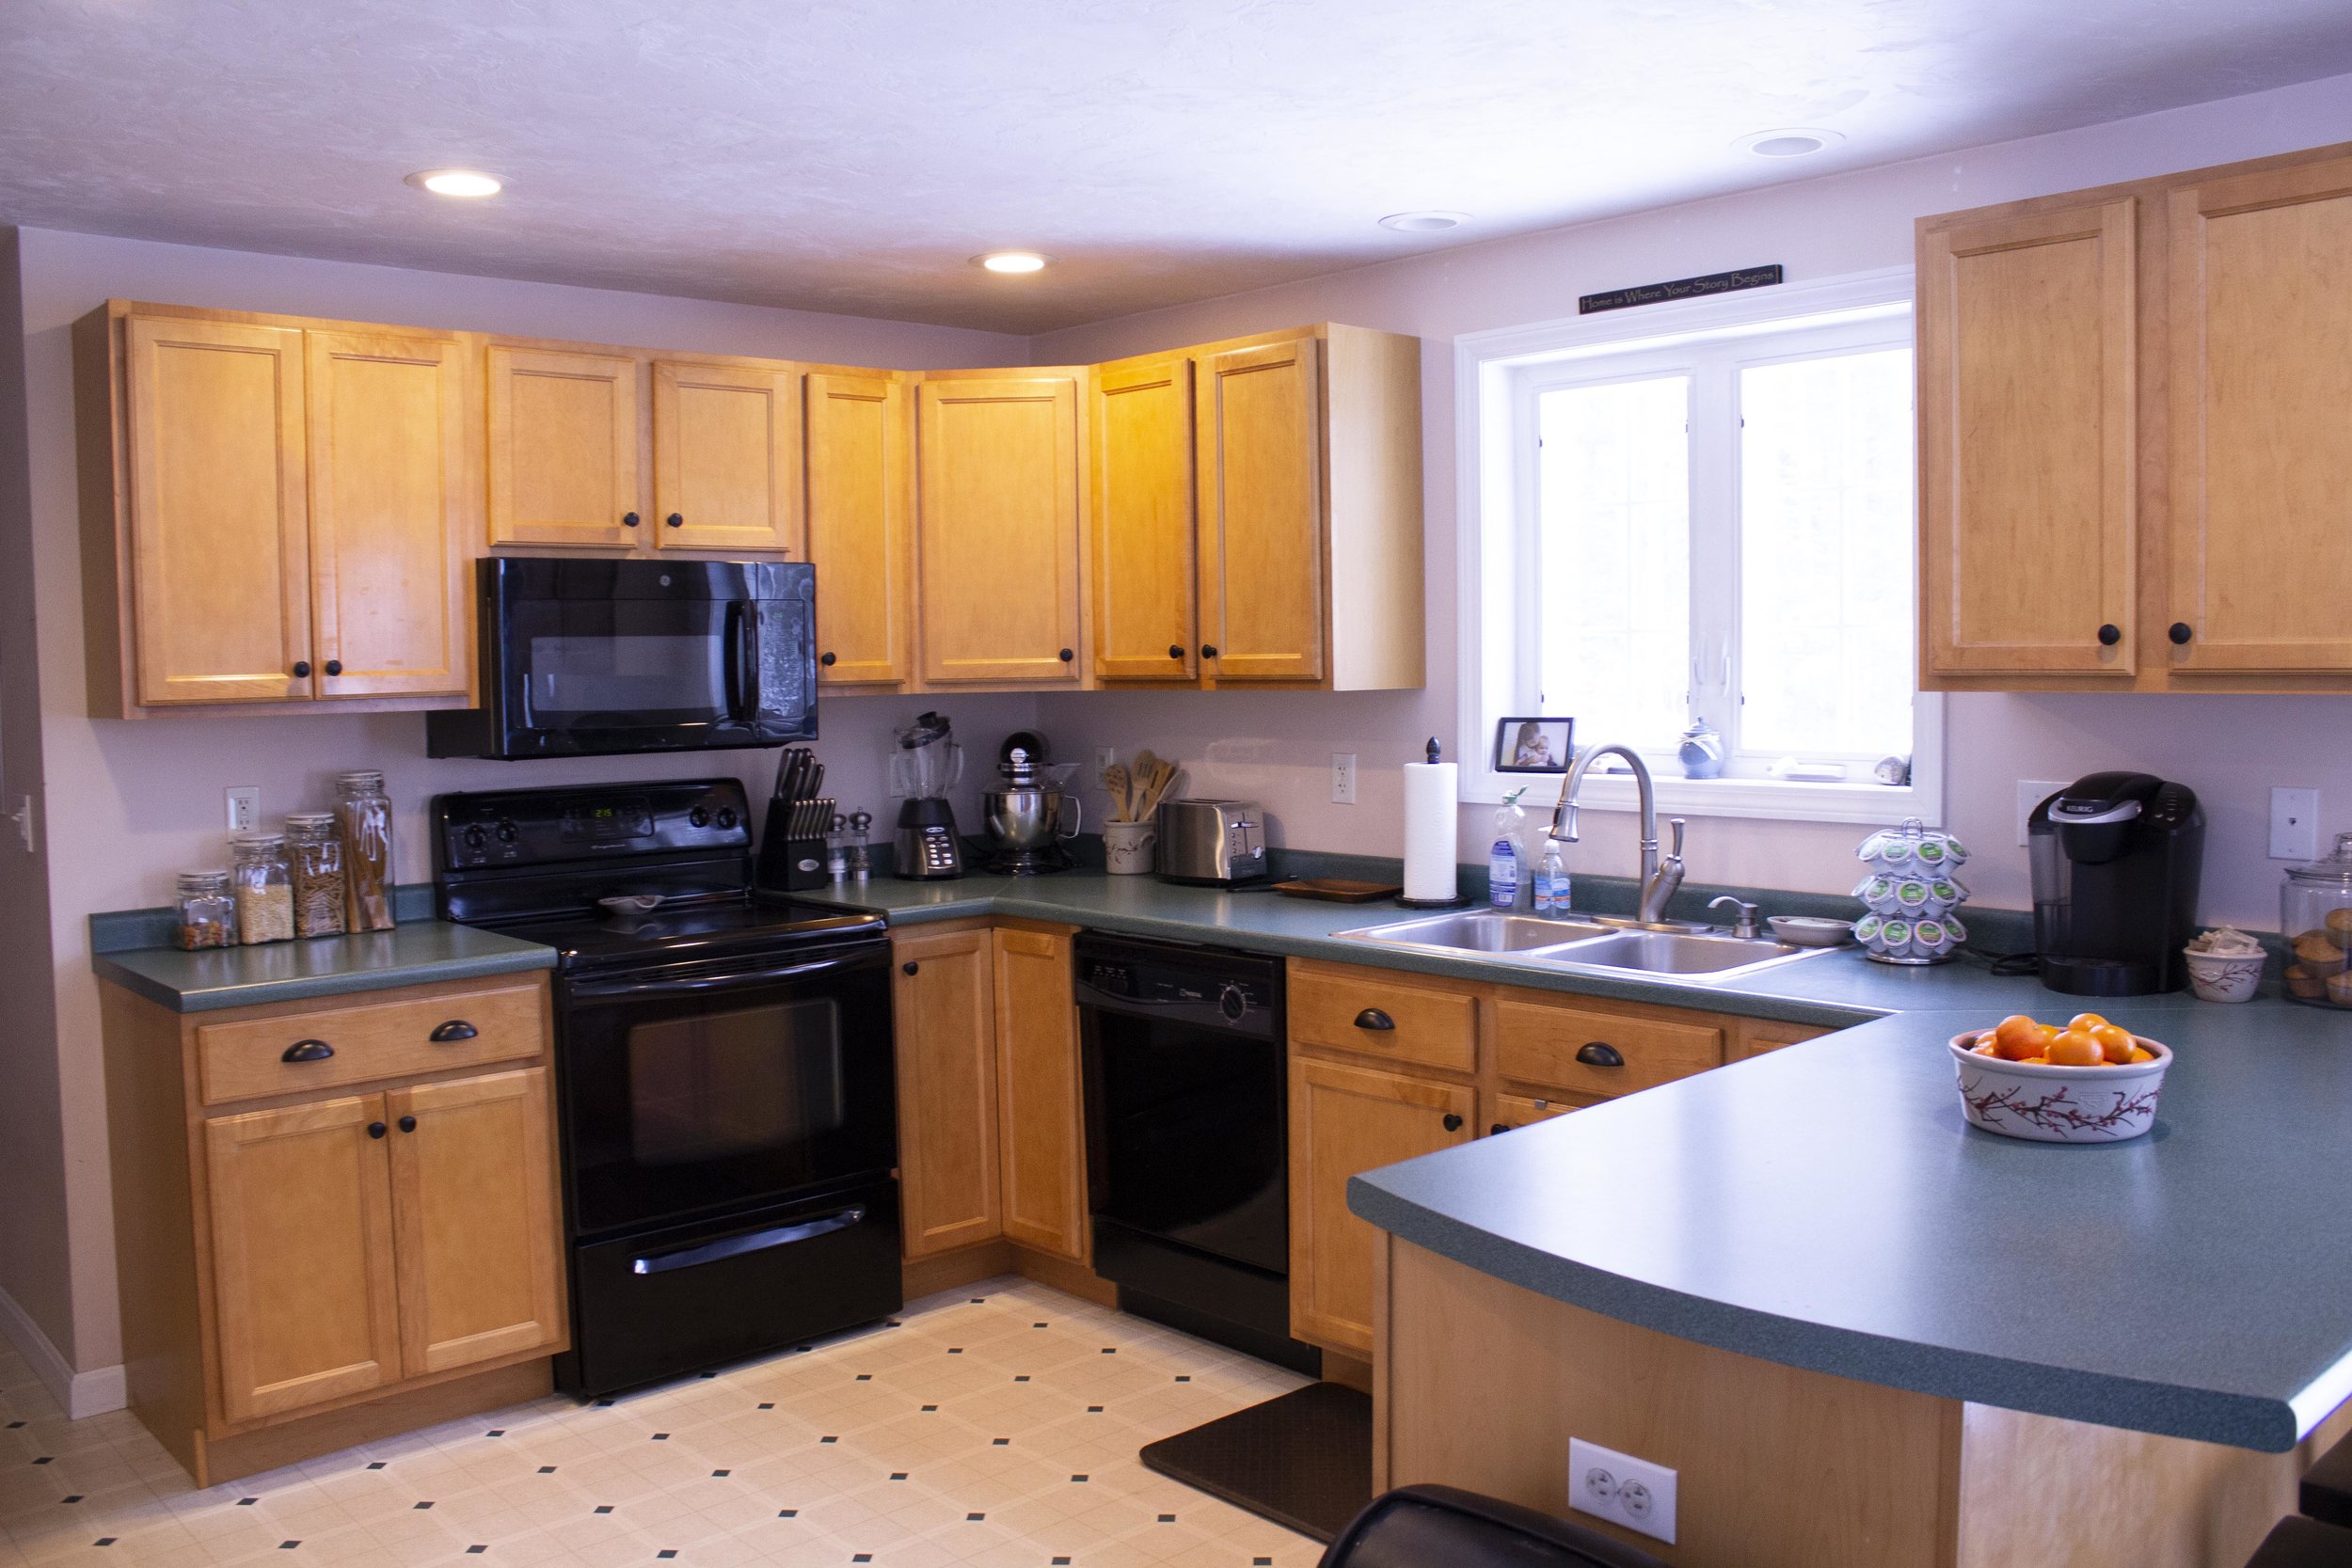
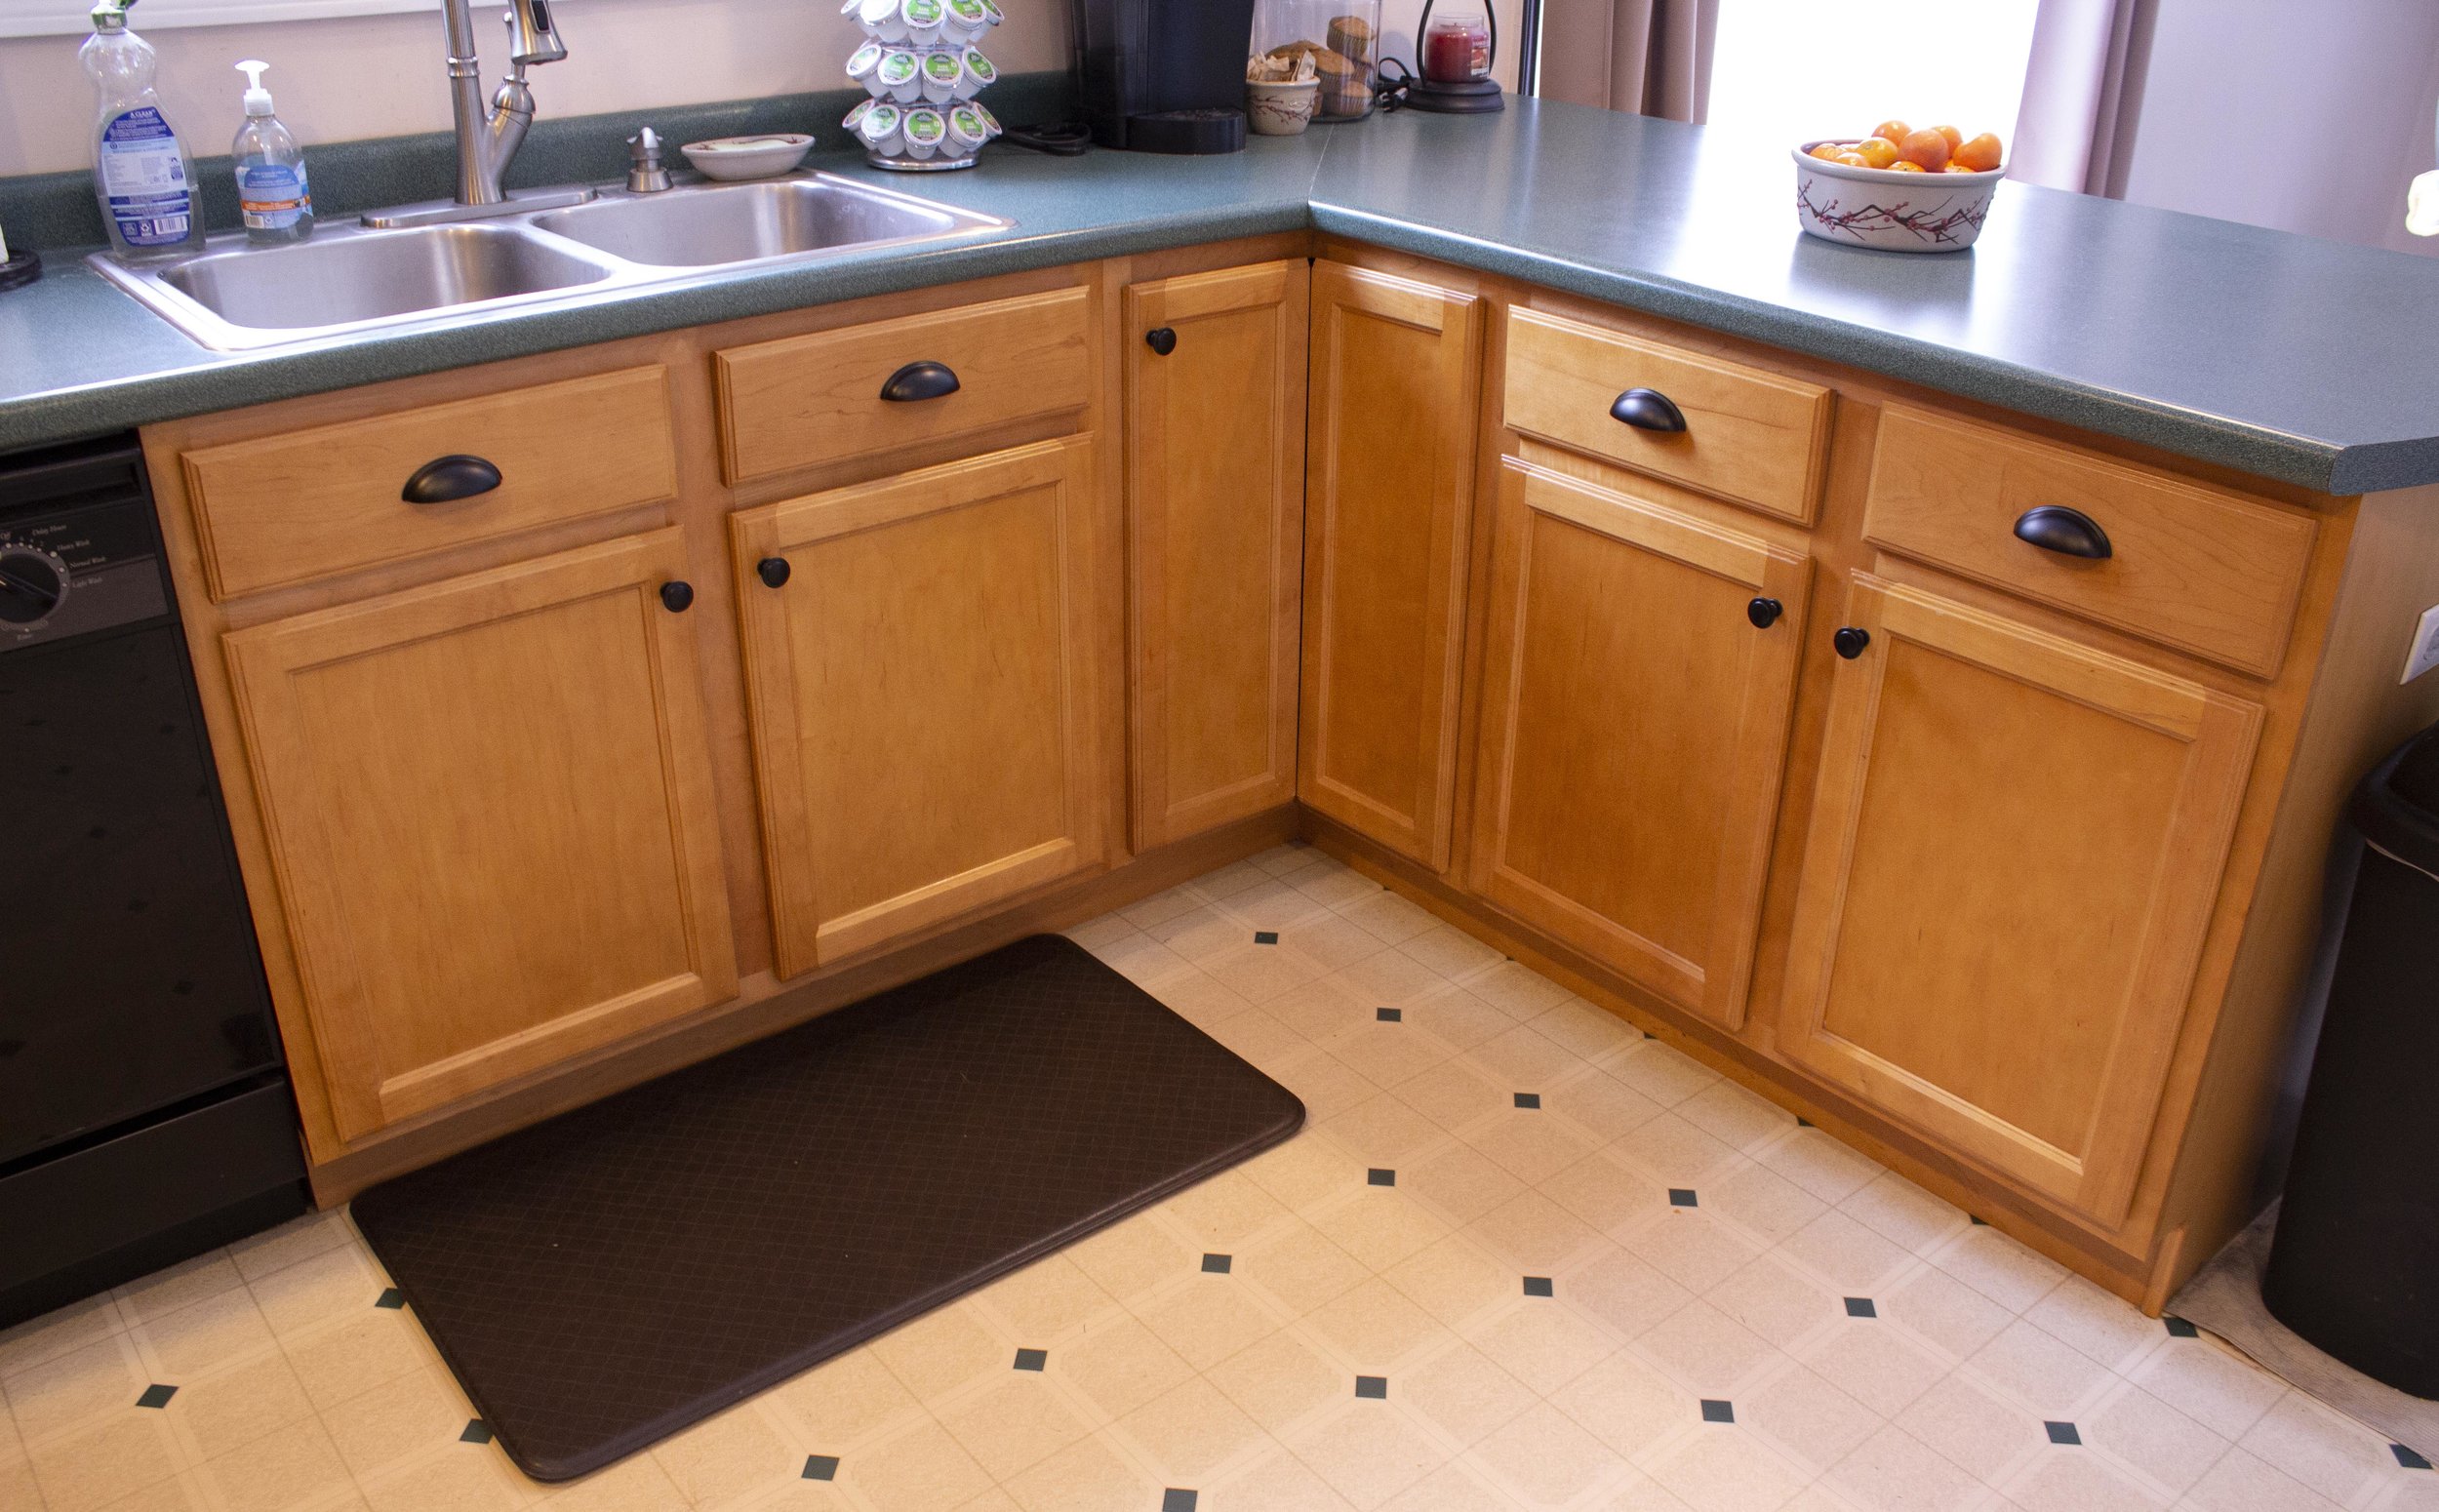
Our home came with a classic late 90’s “builder’s grade kitchen” - you know the type: honey-colored basic cabinets with no hardware and laminate counters. Someday we’d love to totally overhaul the space and paint the cupboards, trim them out, and install granite countertops - however all those things involve a lot of work and money and just aren’t in the budget right now. In the meantime we’re working on making small upgrades ourselves that will make the space look more finished. And what’s the easiest, budget-friendly way to update the look of your cabinets? Replace or install new hardware! If you’re installing new hardware on blank cabinets it can be a bit intimidating, so read on for my tips on installing for the first time. And don’t forget to enter our GIVEAWAY over on Instagram for a $50 Credit to Cosmas Hardware! | This post is sponsored by Cosmas Hardware and affiliate links |
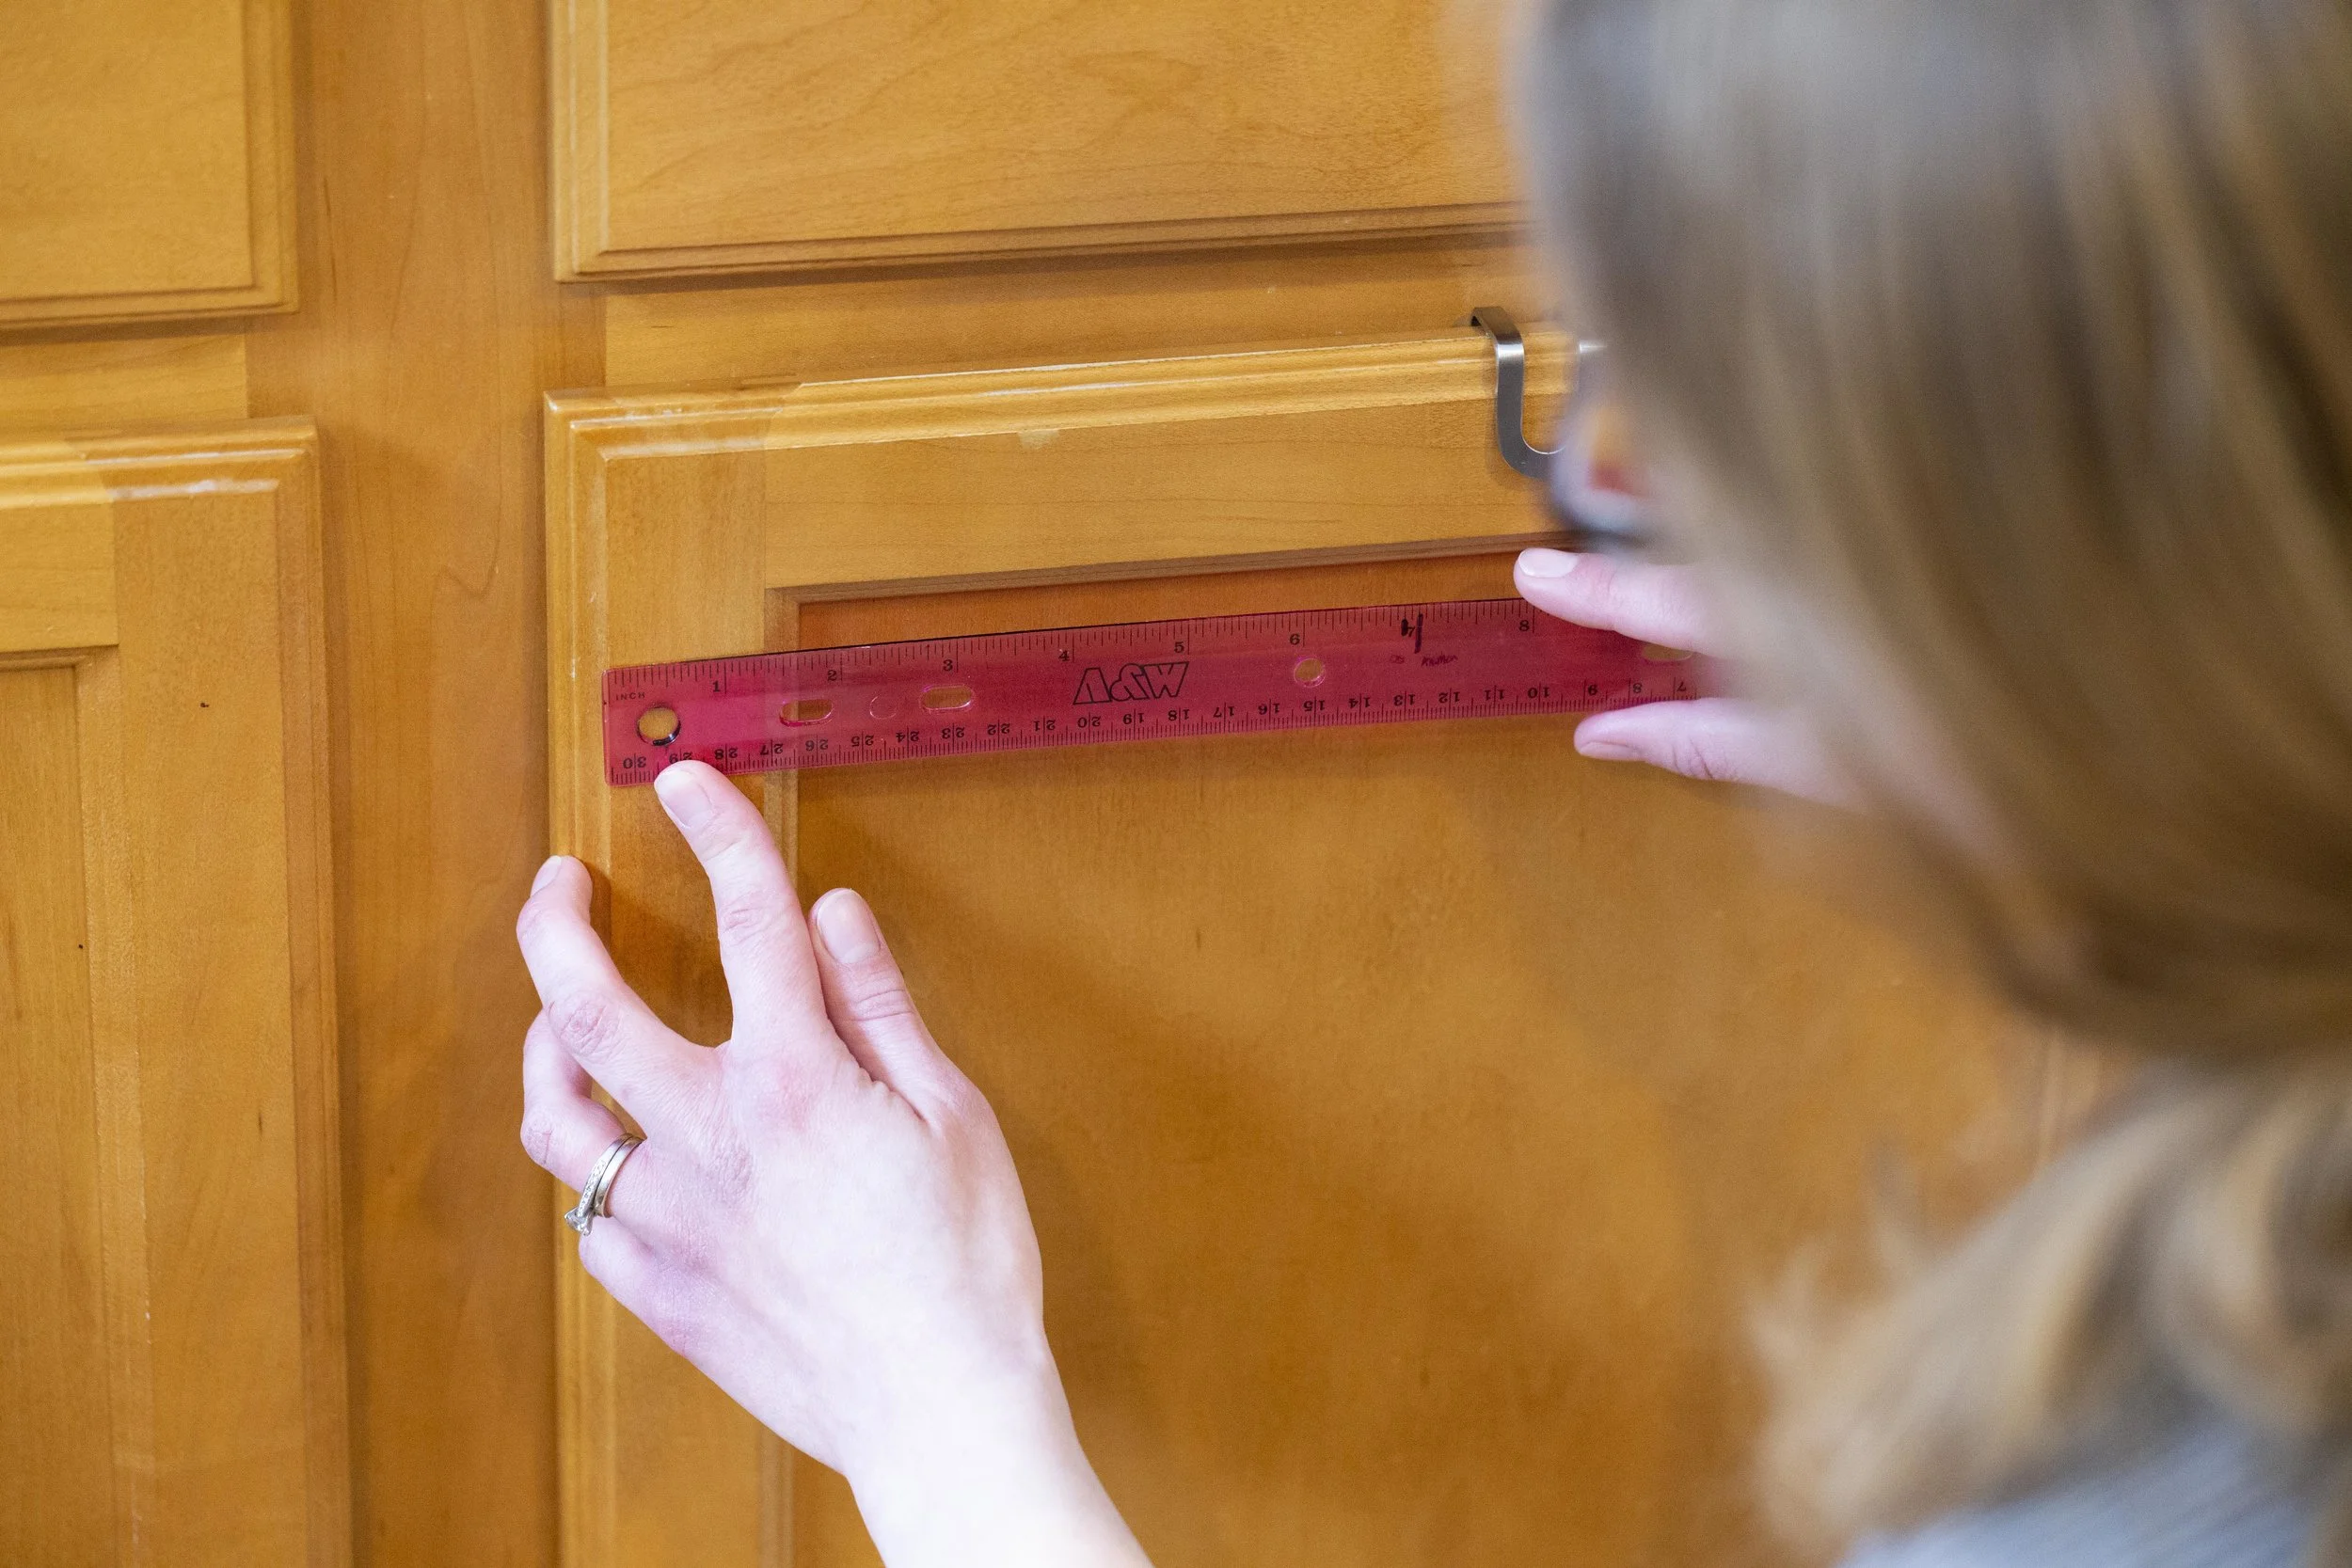
If you’re installing new hardware on a blank cabinet door, the first step is deciding hardware placement. I’m a very visual person so to help me decide on where things would go I first traced the hardware on a piece of black construction paper, cut it out, and taped them to the door and drawer fronts. This way I could step back and play around with the placement before I finalized it.
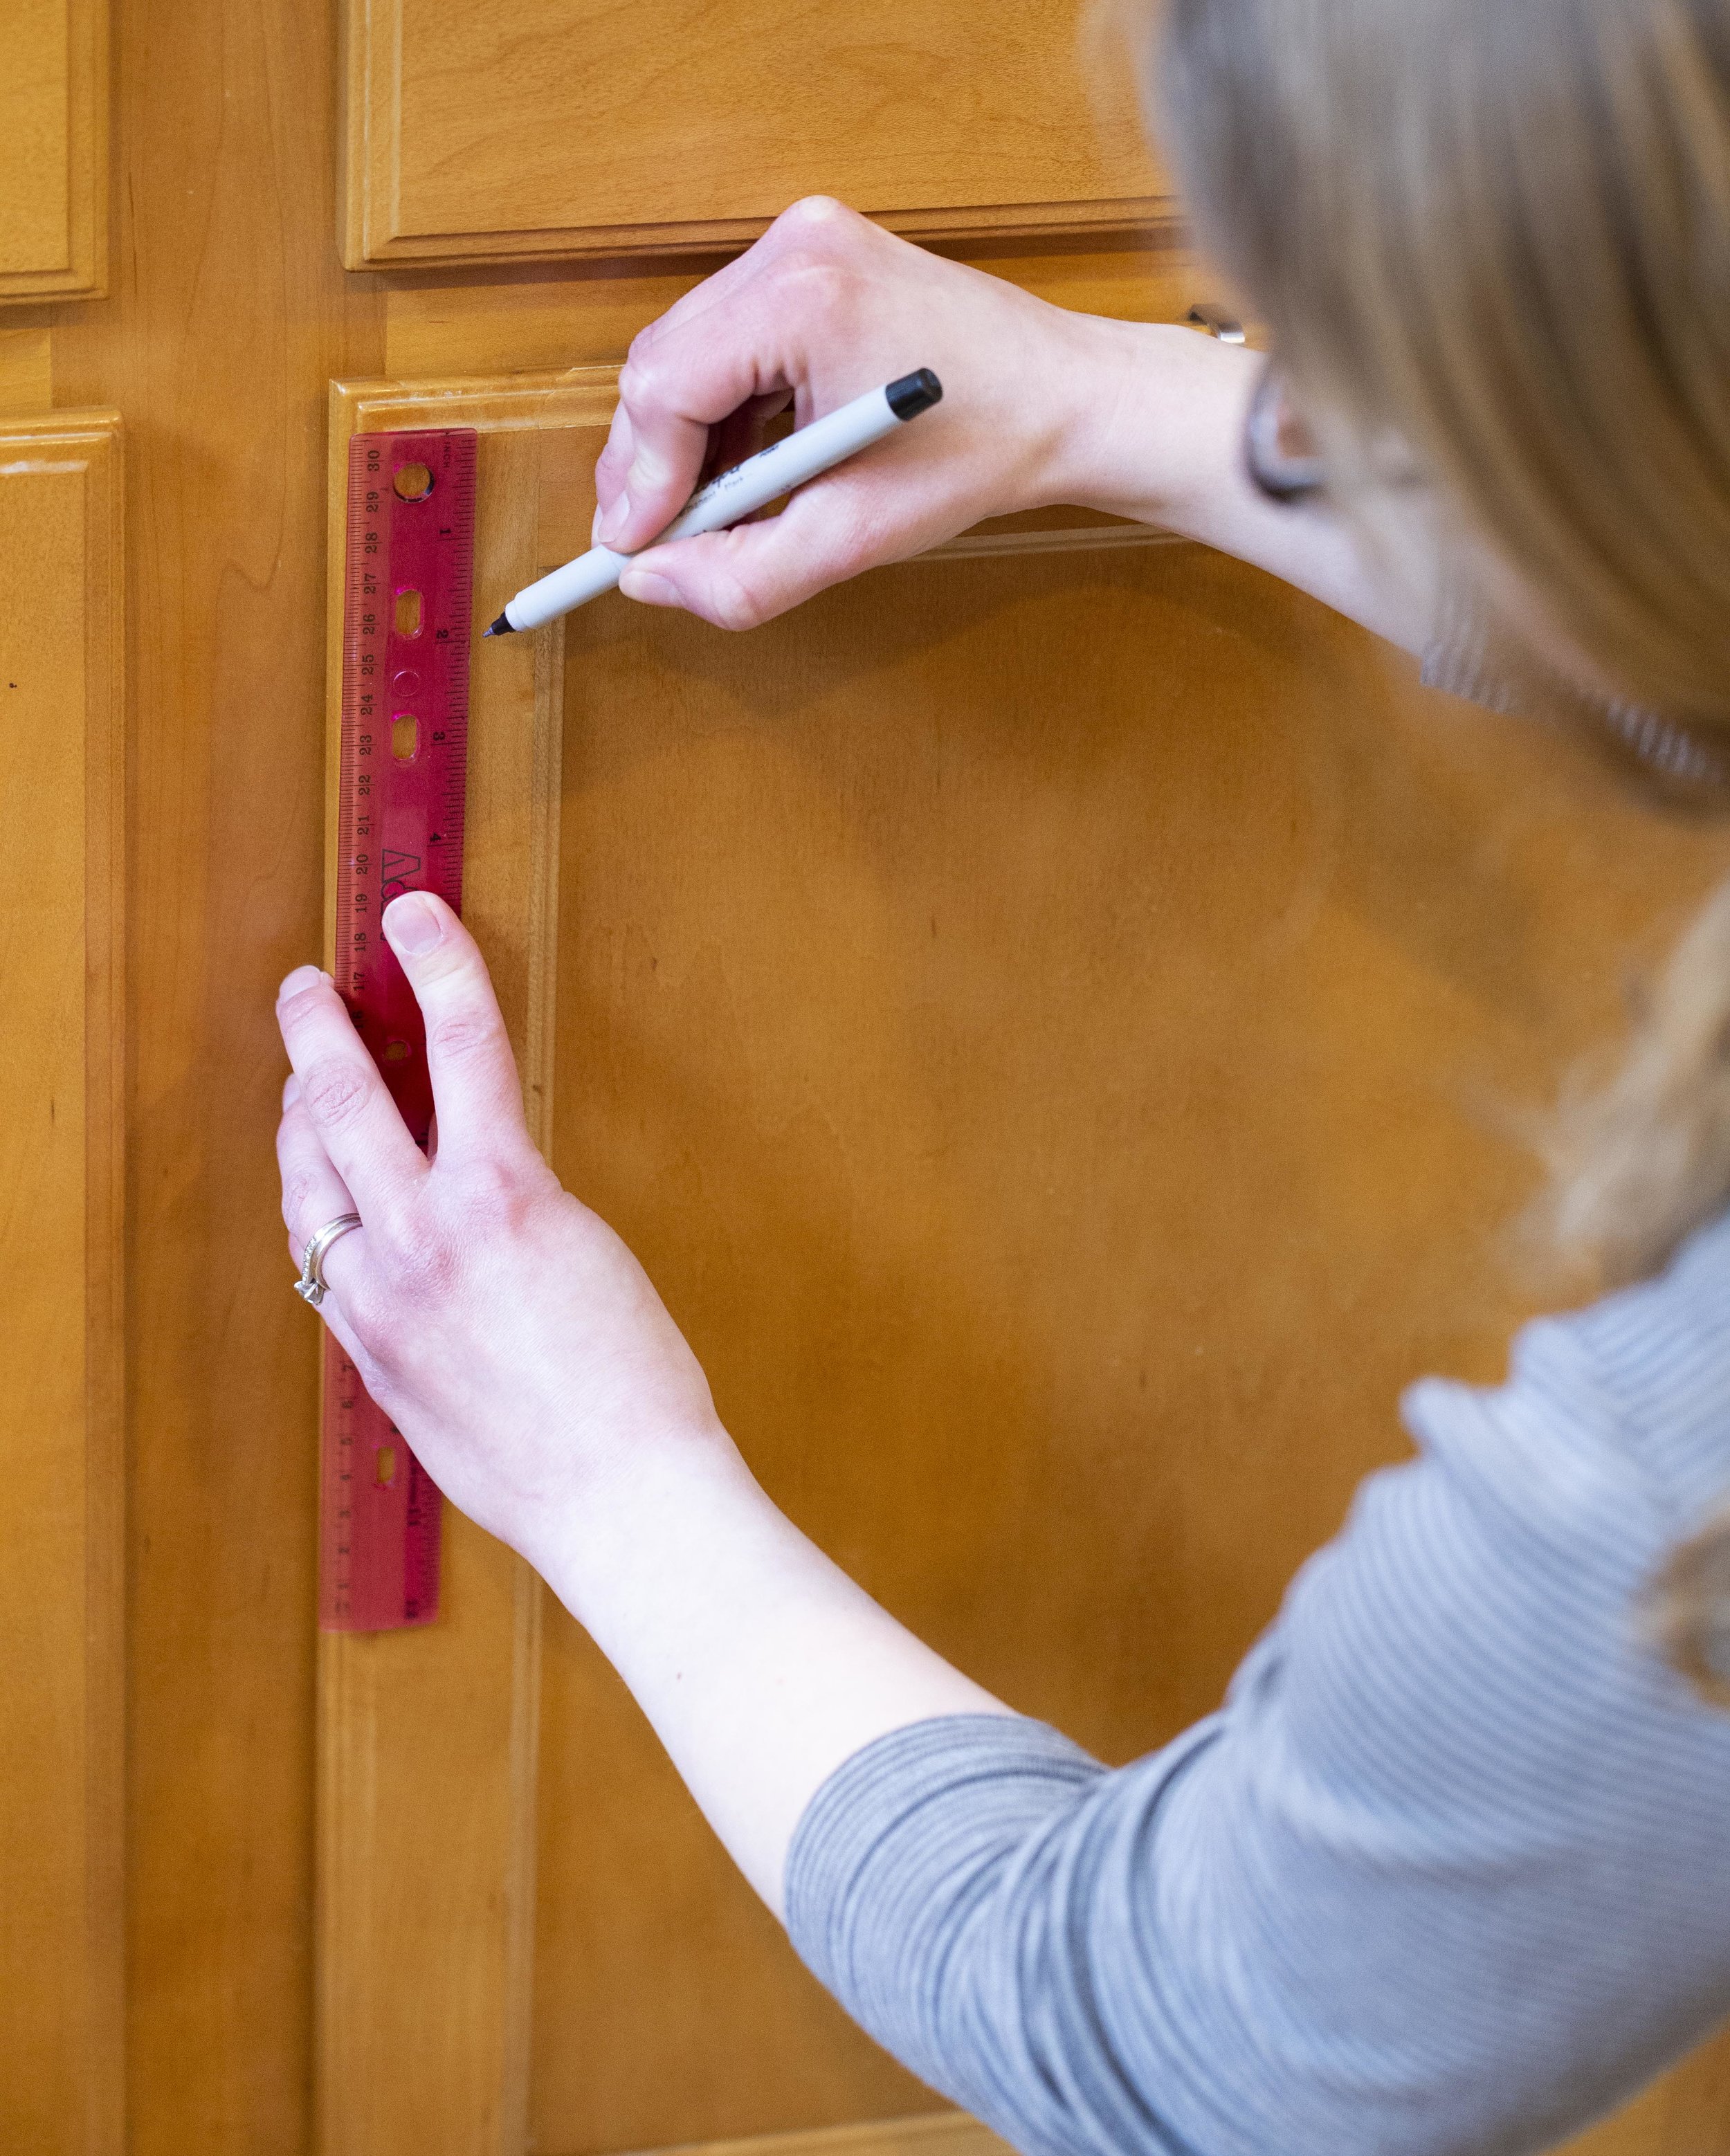
For our cabinets, we decided we liked the knobs two inches from the edge of the cabinet (not including the beveled edge). Once we decided on this placement, it was just a matter of measuring it out on all the cabinet doors so they were centered side-to-side on the trim piece as well as two inches in. Consistency is key to having uniform placement - and I made sure to measure multiple times in both directions before marking it with a pen
It’s important to measure the knobs on each door independently - if the doors aren’t hung evenly, it may look off initially but the hinges can be adjusted later so everything (the doors themselves as well as the hardware) will line up visually.
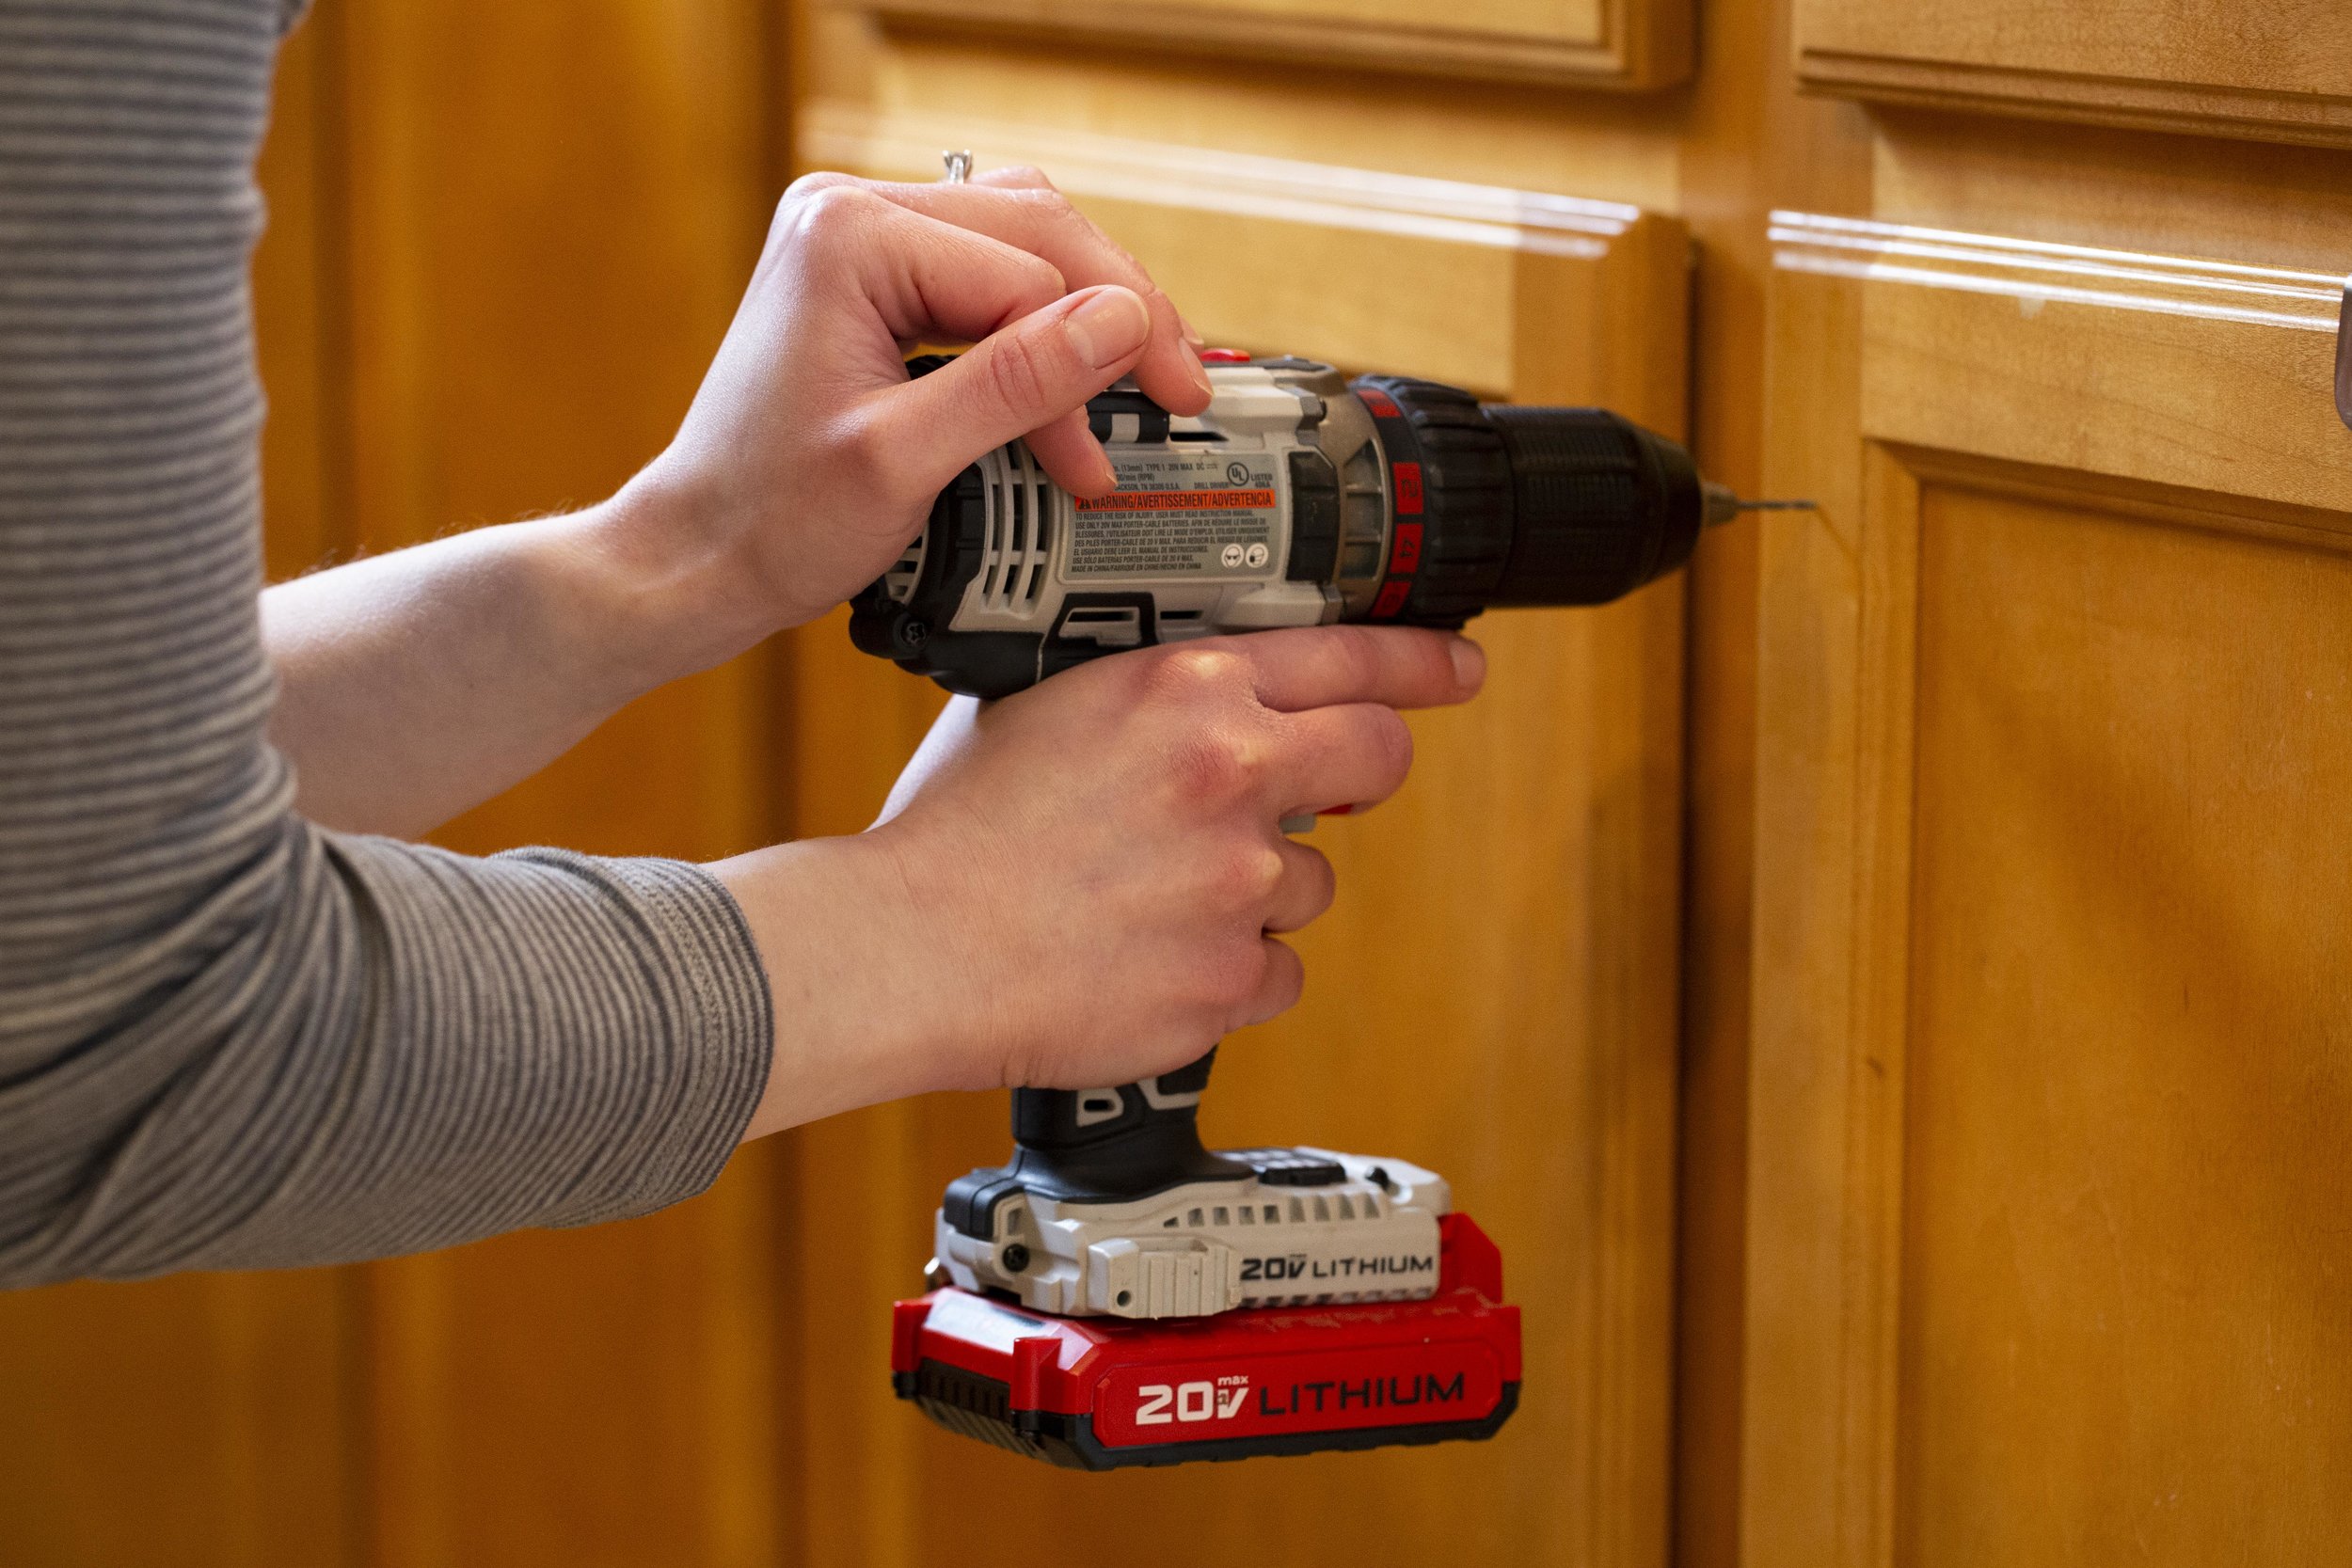
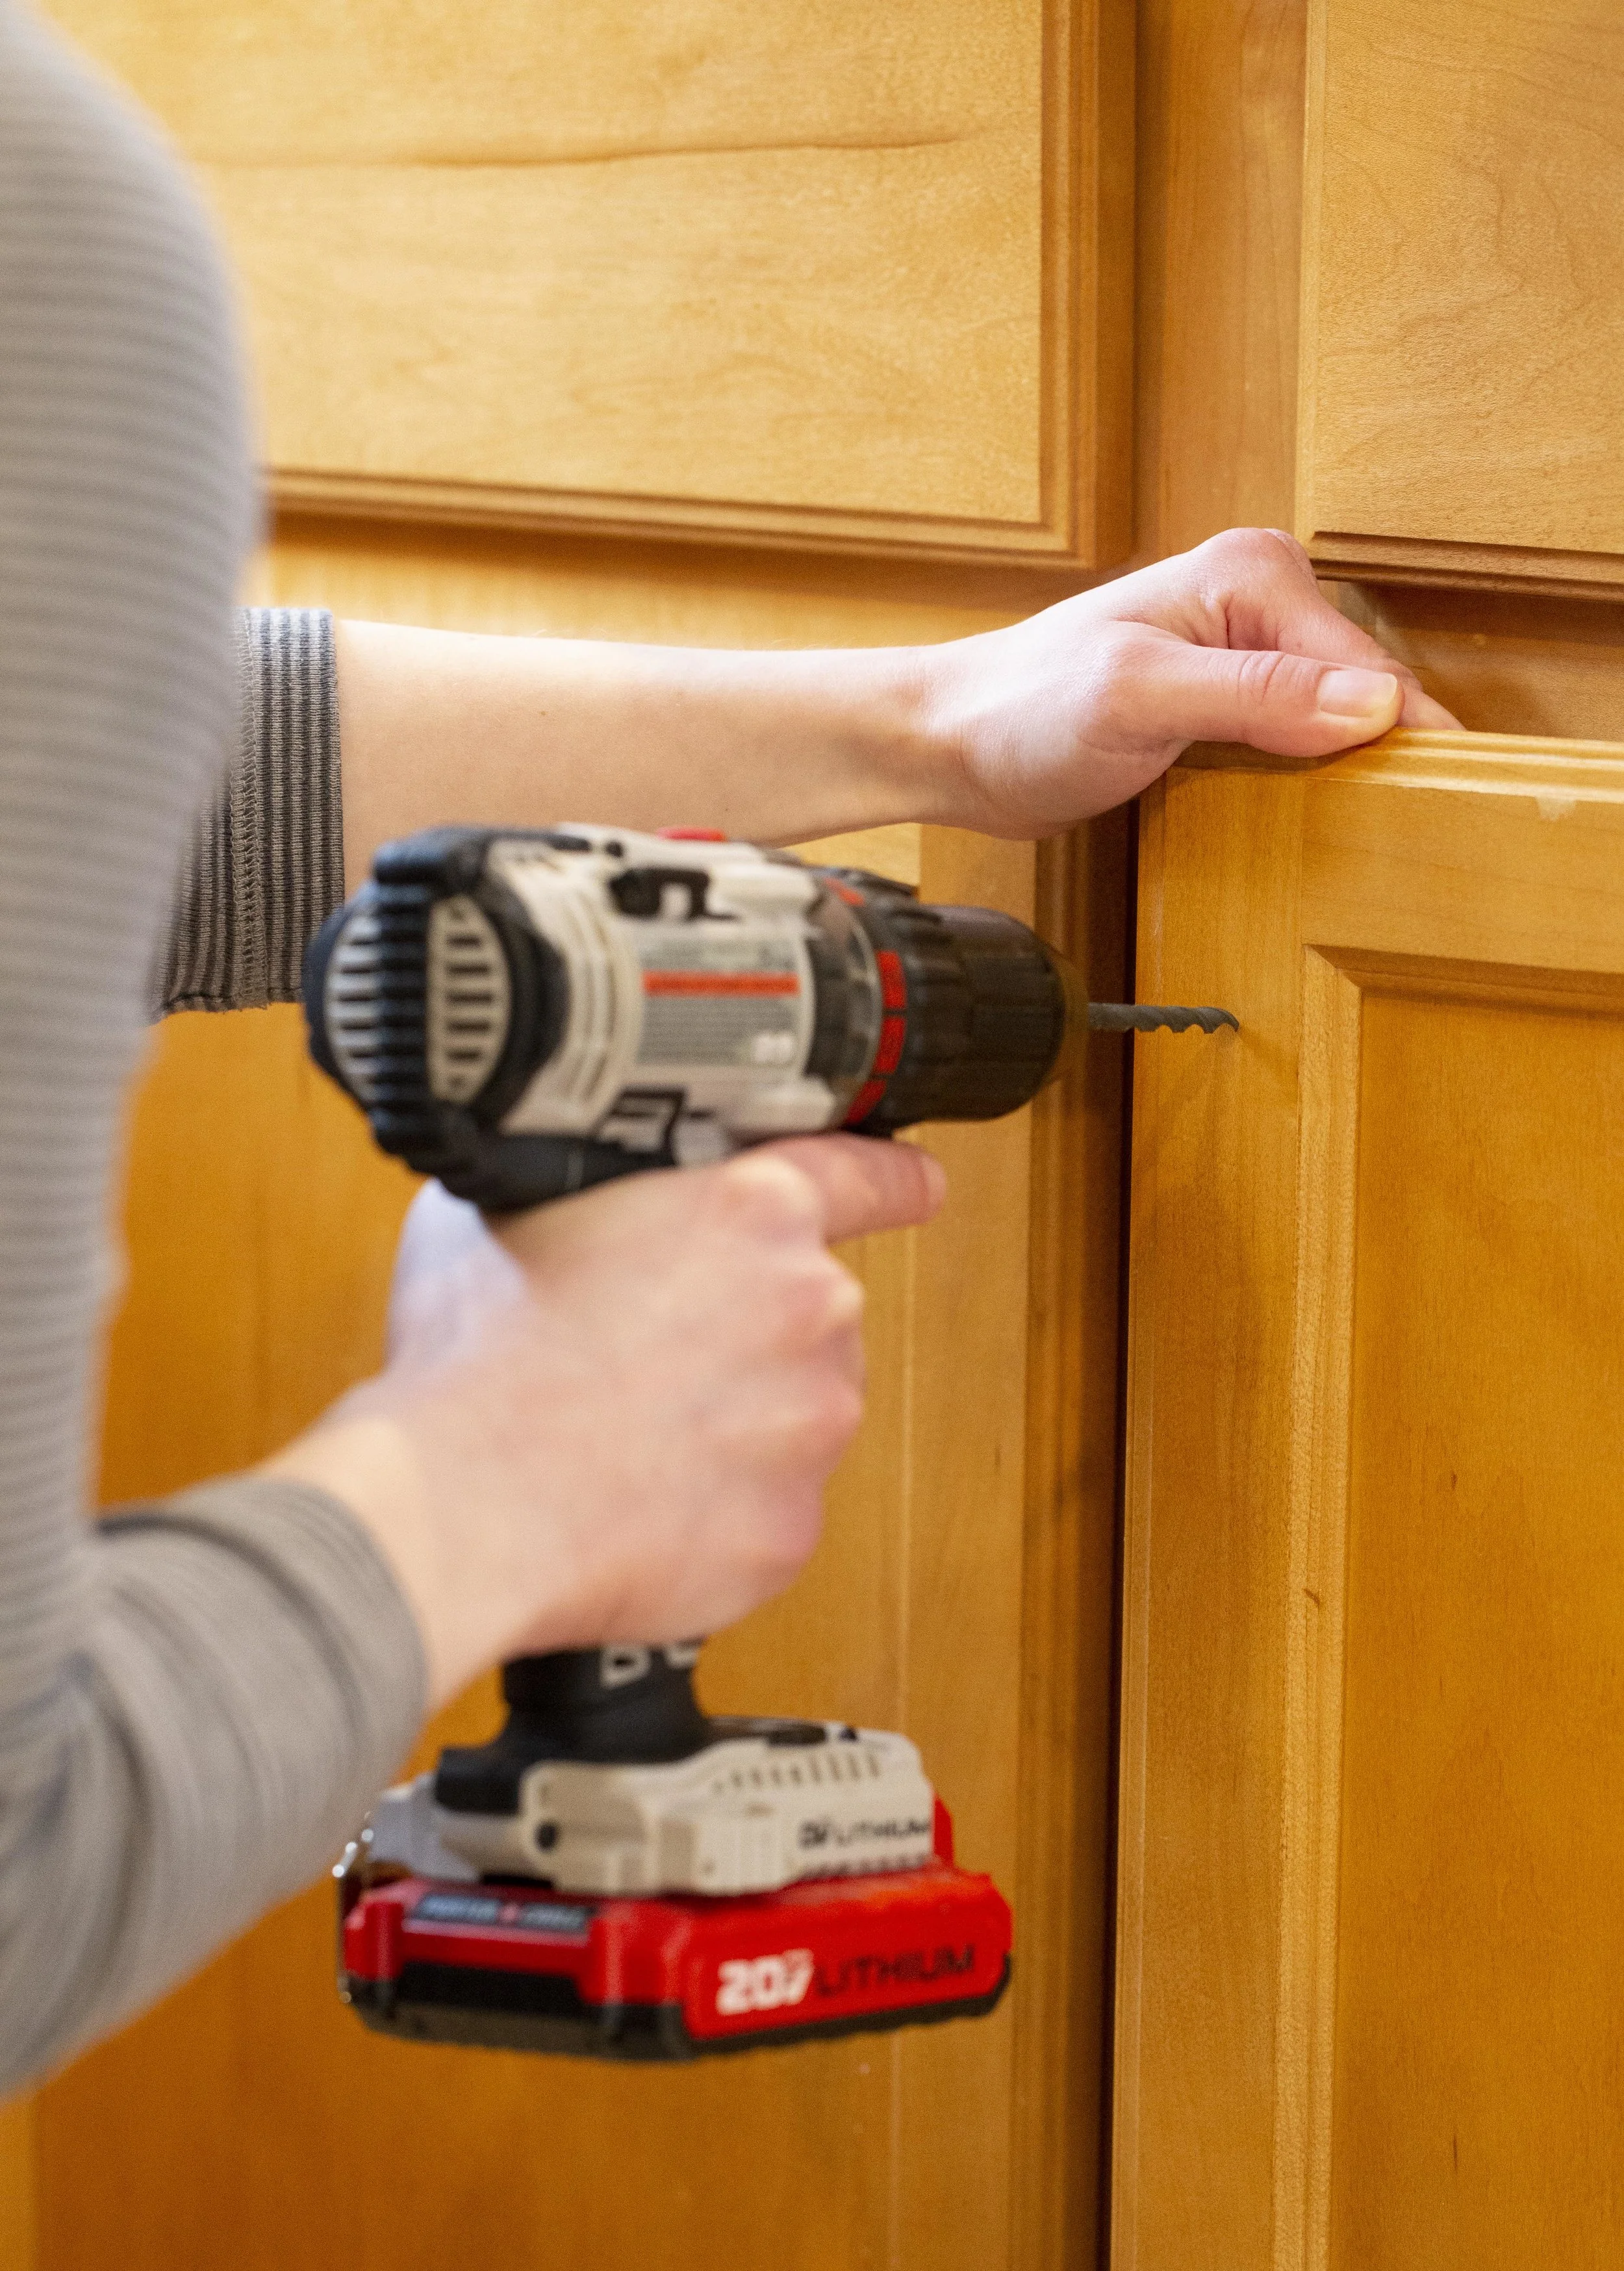
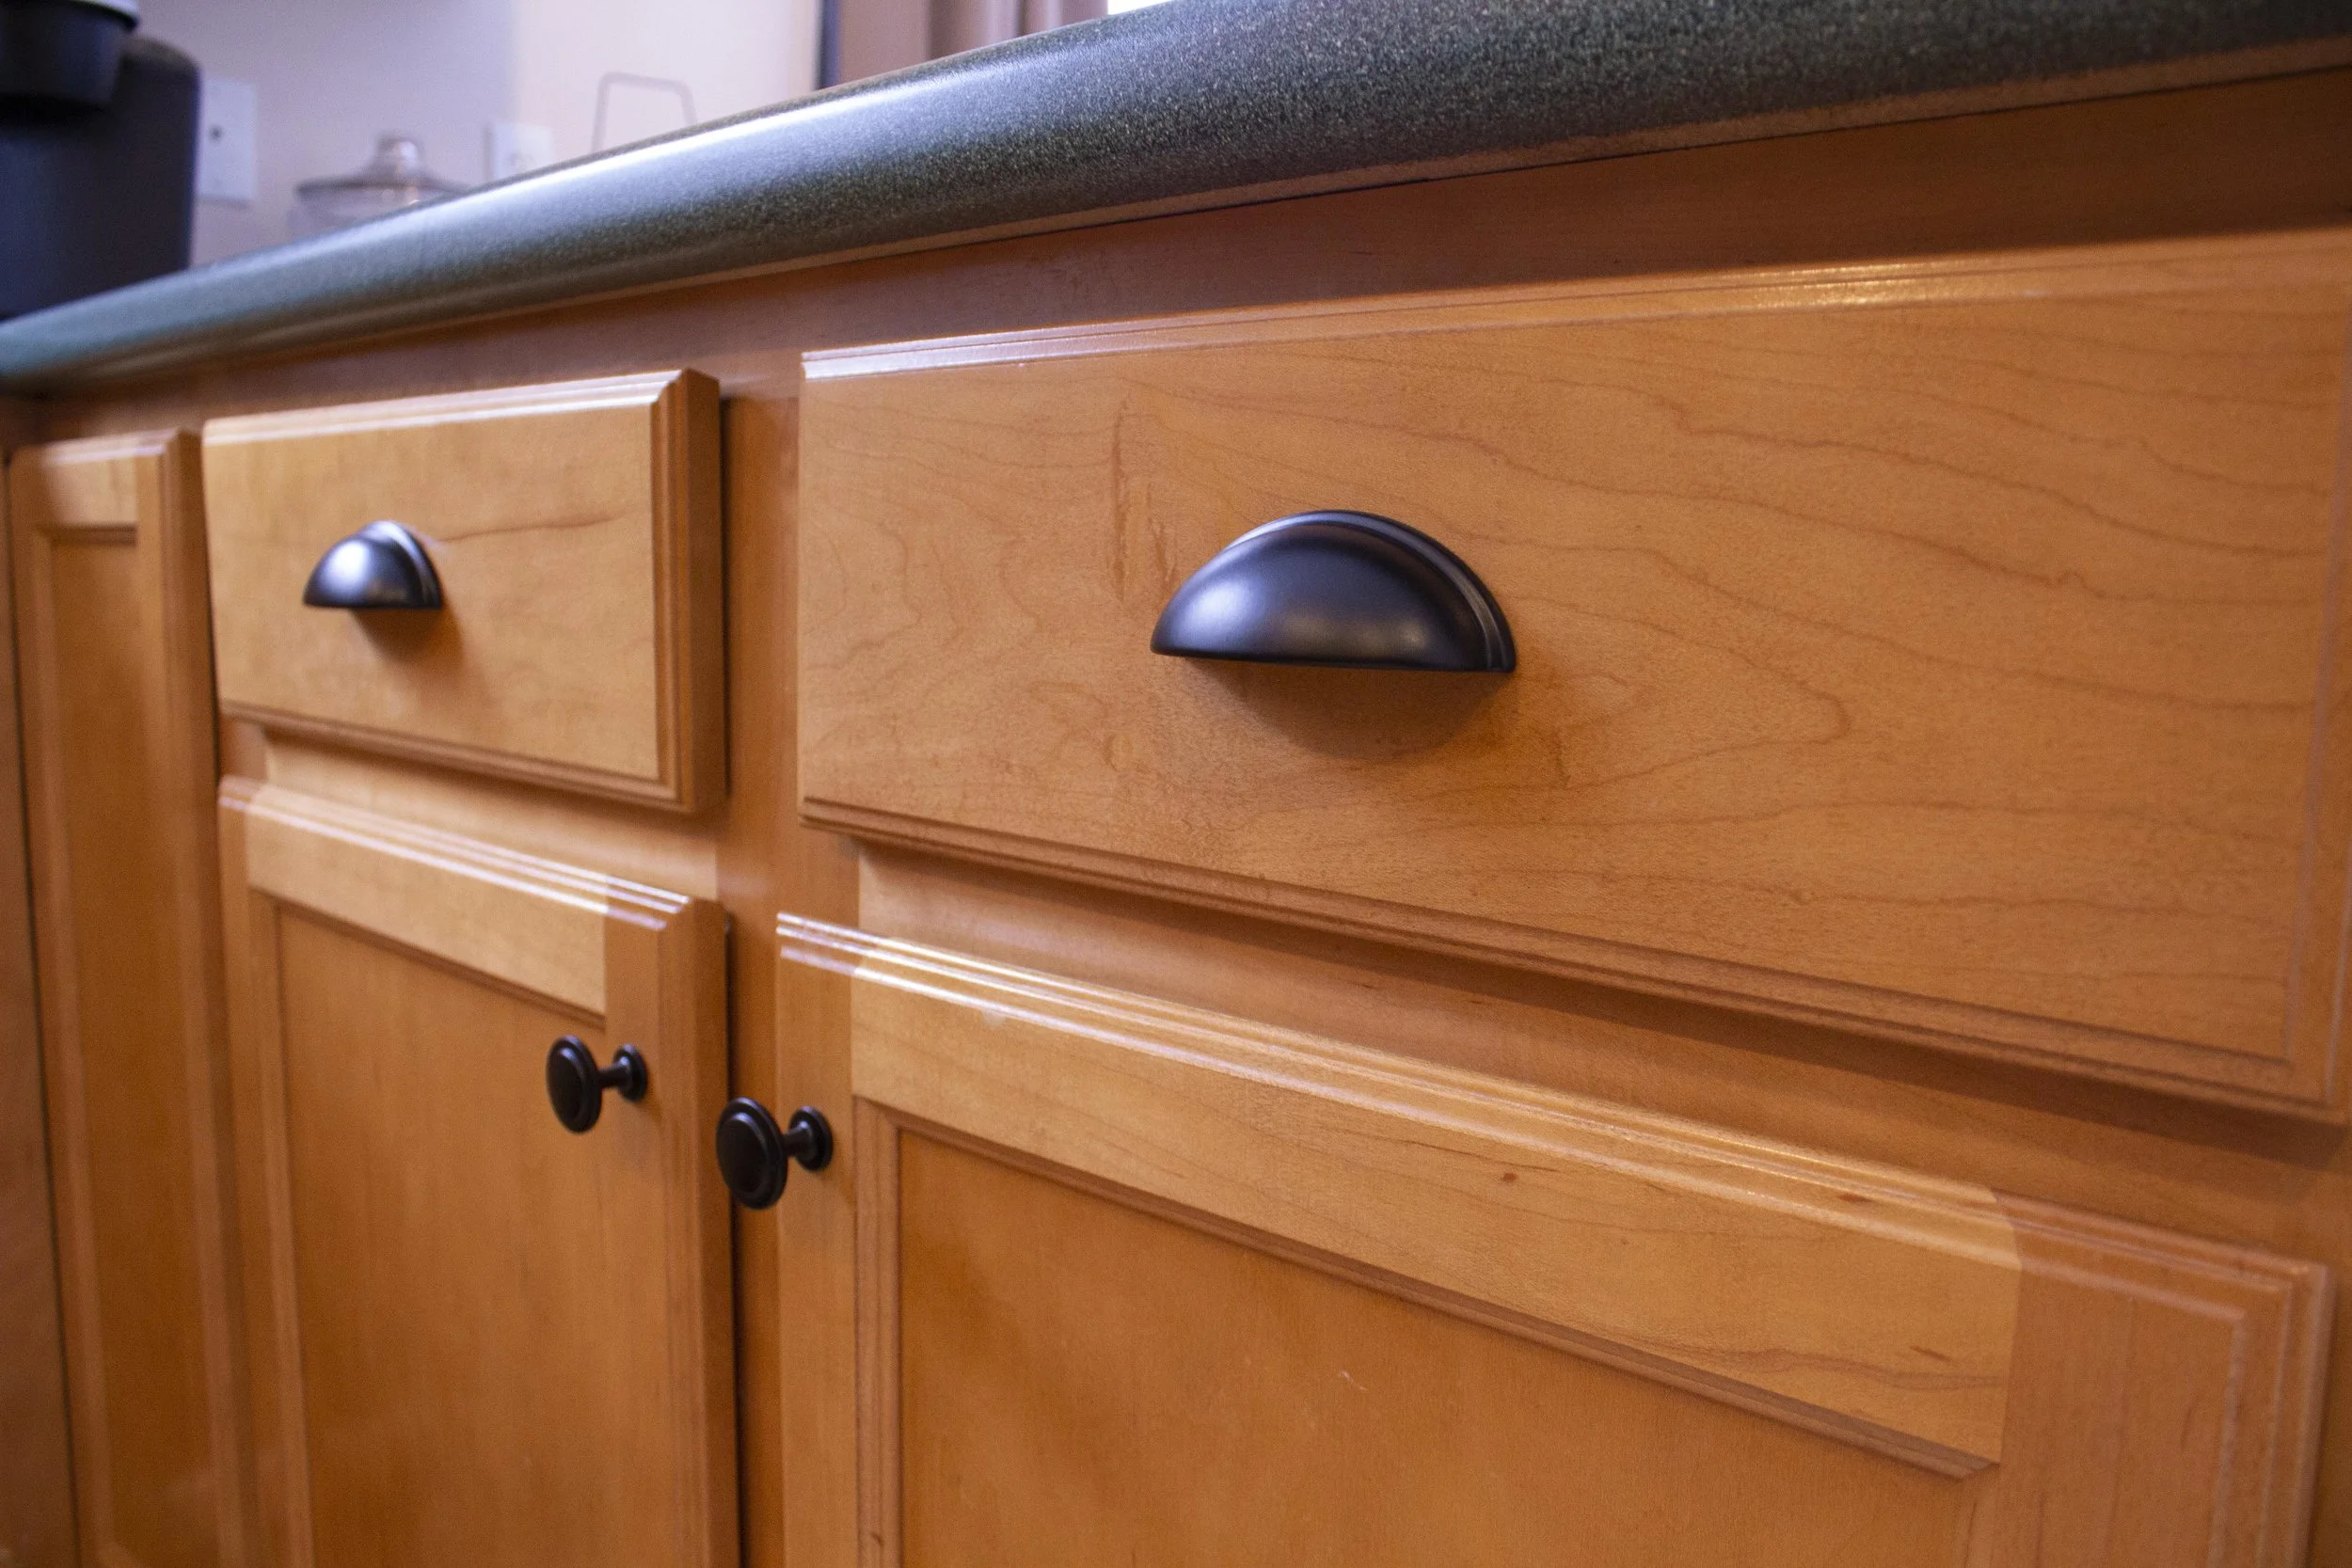
When it comes time to drill the holes, it’s important to make a small pilot (starter) hole before you drill the full size hole. There’s several reasons for this, but the two most important ones being that larger drill bits tend to “walk” when you drill on a smooth surface, and without drilling a pilot hole first you might end up off your mark. The other important reason is that pre-drilling the hole smaller first will help lessen the chance of the wood splitting. Be aware of what’s behind the cabinet front when you drill! Make sure you aren’t drilling into the cabinet frame or dishes that may be in the cabinet behind the door. For the larger hole you’ll want the drill bit diameter to be just barely bigger than the diameter of the screws that come with the hardware.
Once the larger hole is drilled, slide the screw in from the back and use a screwdriver to hold it in place while you thread the knob on snuggly.
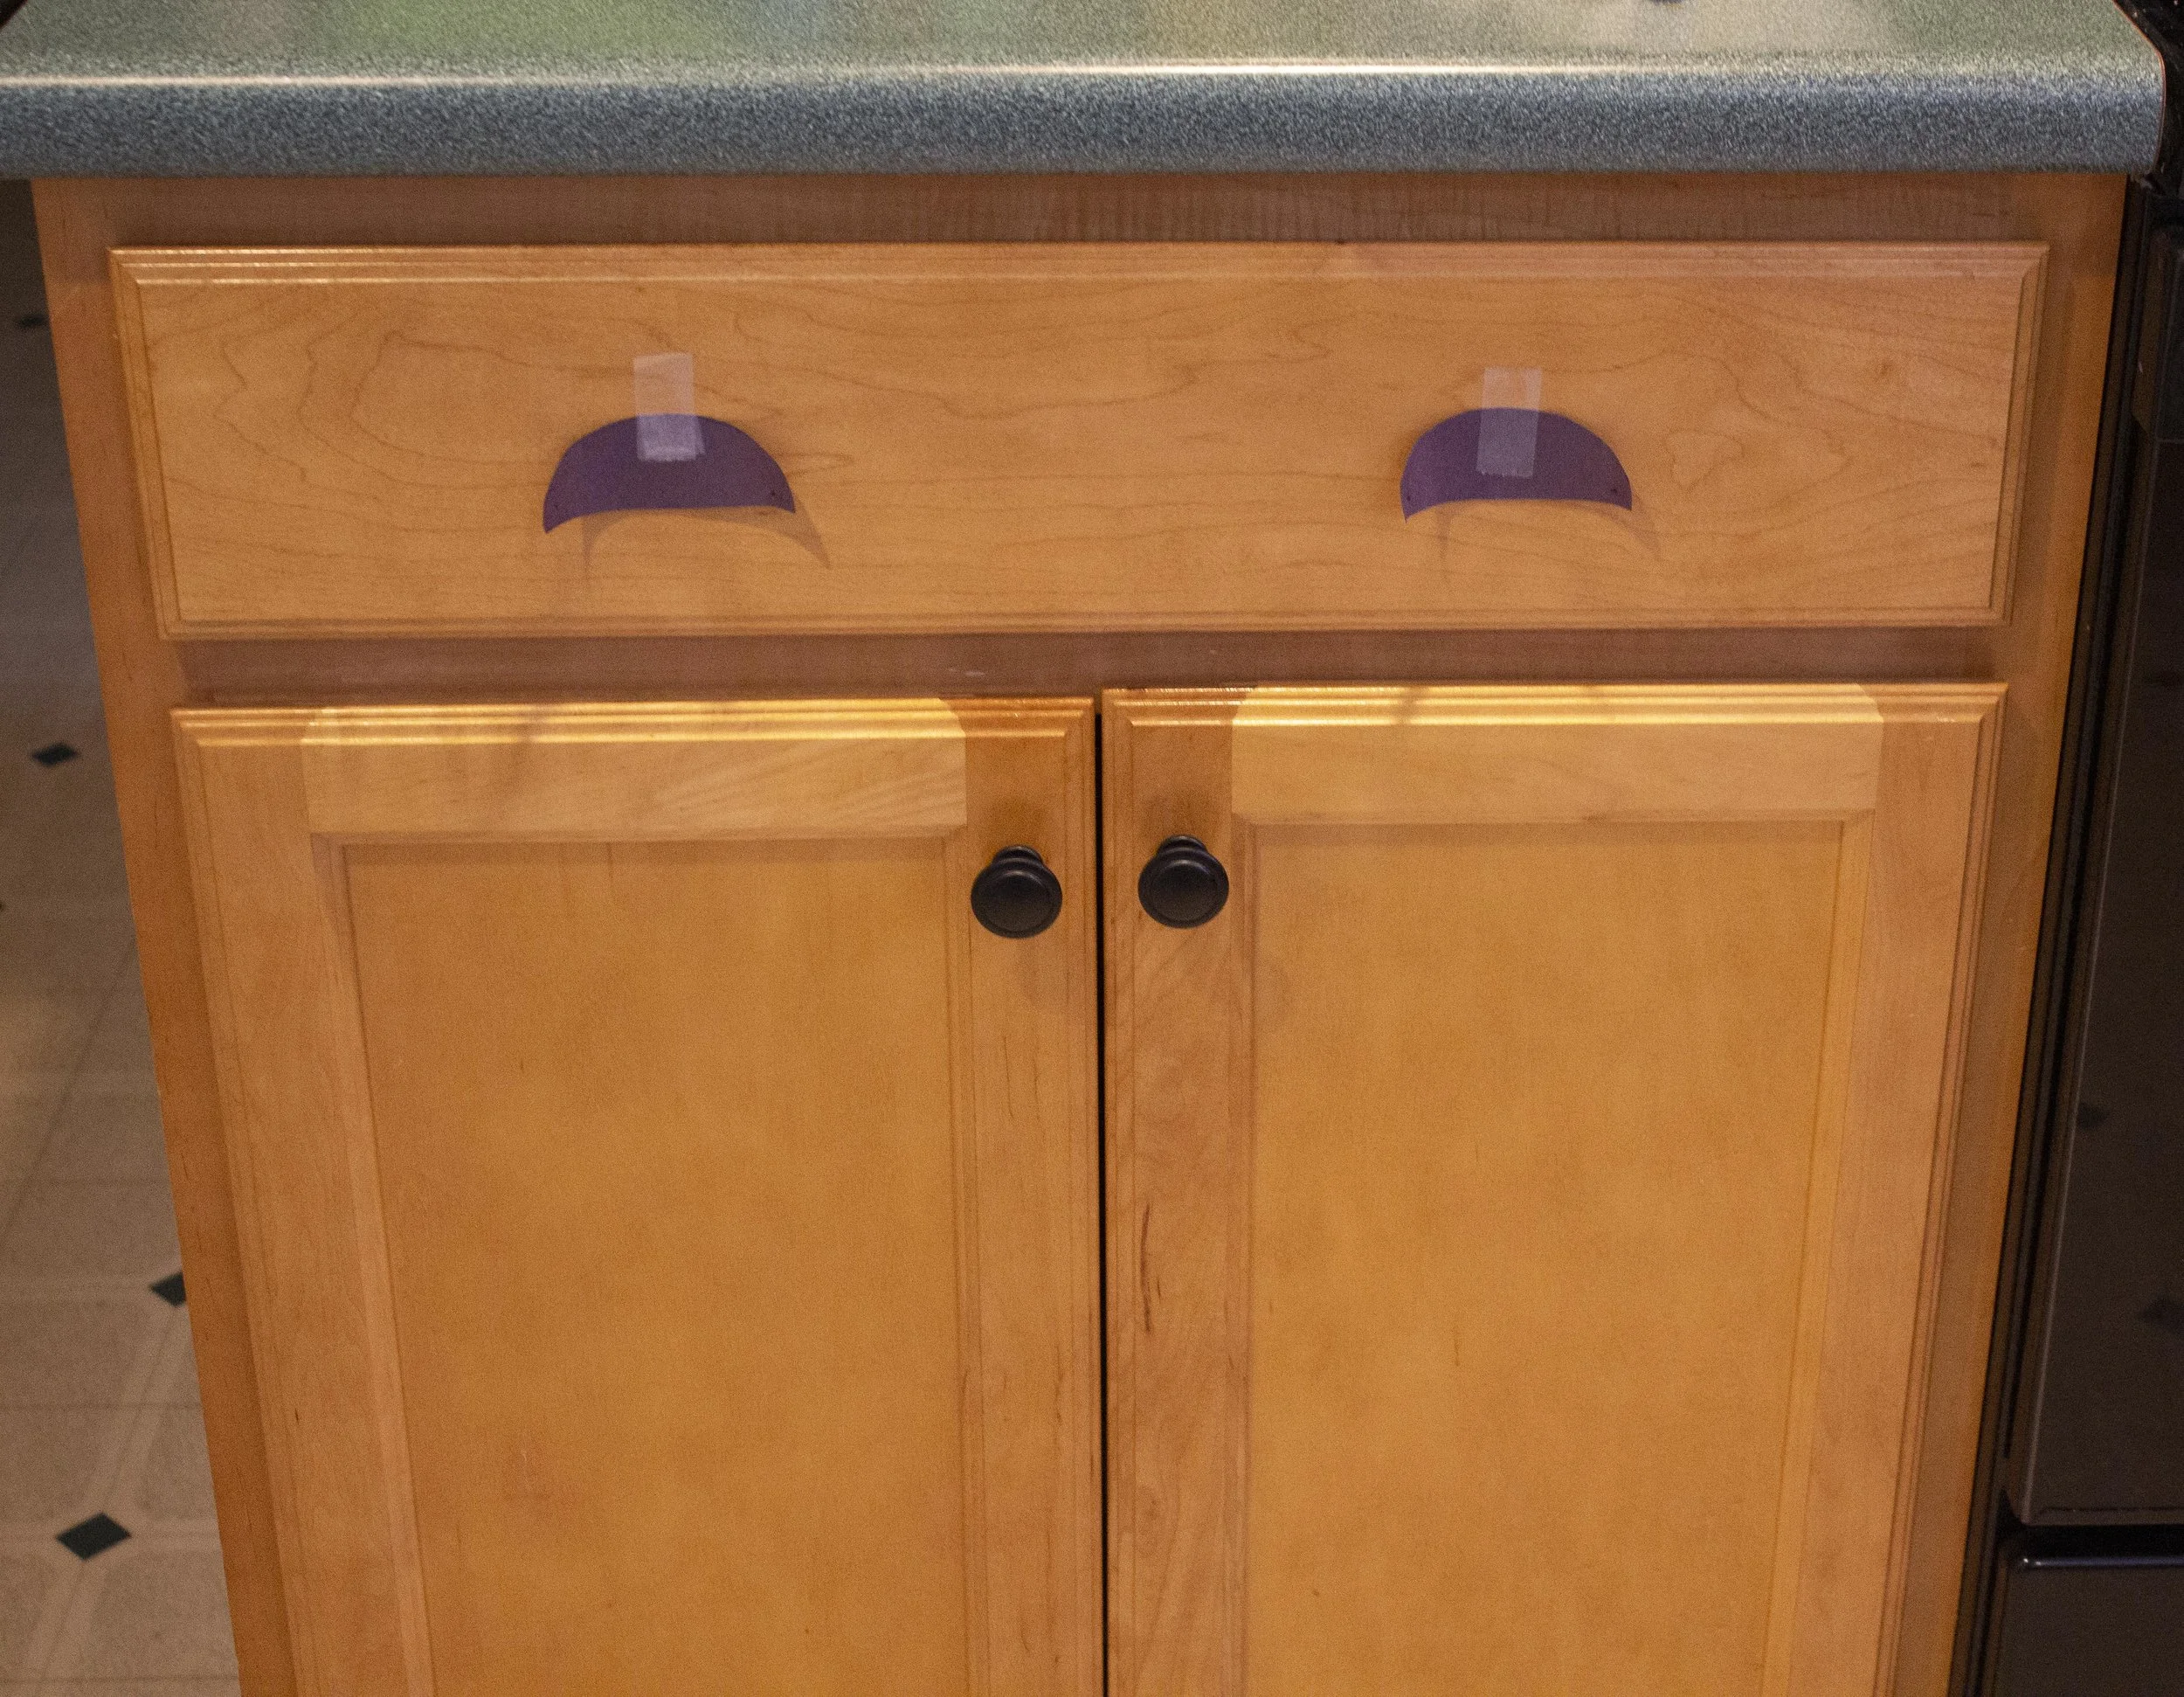
Deciding on drawer pull placement. (Note that while the lower cabinet knobs are each in the correct place, they look off since the cabinet doors are uneven - this can be fixed by adjusting the cabinet door hinges, which I did once I was finished installing all the hardware.)
For the drawer pulls I followed a similar procedure as I did for the door fronts. One thing I had to keep in mind though is the drawer pulls I chose aren’t symmetrical top-to-bottom - the mounting screws are towards the bottom of of the pulls. Therefore, playing around with the placement of the drawer pulls was very important - the drawer pulls needed to look centered visually from top to bottom on the drawer fronts, even though that made for the screw placement to be slightly below center.
Once I liked the visual placement of the paper templates I carefully measured out the spacing on each side as well as down from the screw holes to make sure everything was accurate and even. These particular drawer pulls have screws 3” apart so I made sure that the spacing between the screw markings was accurate as well. (Once you get an idea of placement, you could also use a Cabinet Hardware Template here to help mark everything out.) In our kitchen the drawers are three different sizes, so this process needed to be repeated several times - on the shorter drawers I used one pull, and on the longer drawer I used two pulls.
After the hole placements were marked, I remeasured the spacings several times before drilling the pilot holes and then the screw holes. Then it’s simply a matter of screwing the screws in from the backside of the drawers with a screwdriver into the drawer pulls.
AFTER
And that’s it - the whole project took less than an afternoon to do and it really helps our kitchen look more finished. I just love how it came out! Once we replace our countertops with a more modern granite counter the space will really look sharp and the hardware will compliment it beautifully.
GIVEAWAY!
Head on over to our Instagram for details and to enter our Giveaway with Cosmas Hardware for a $50 shop credit so you can update the look of your kitchen too with the hardware of your choice!
- I received these items from Cosmas Hardware but all opinions expressed are my own. Please read our full Disclosure Policy for more information -
Disclaimer: Installing new cabinet hardware from scratch is something that most people can very easily do on their own and here I’ve shared my tips on the easiest way I’ve personally found to measure and install them. However, use your best judgement when installing your hardware - if you’re in doubt of your measuring or drilling skills, there’s no harm in consulting a professional before you tackle this or any project.
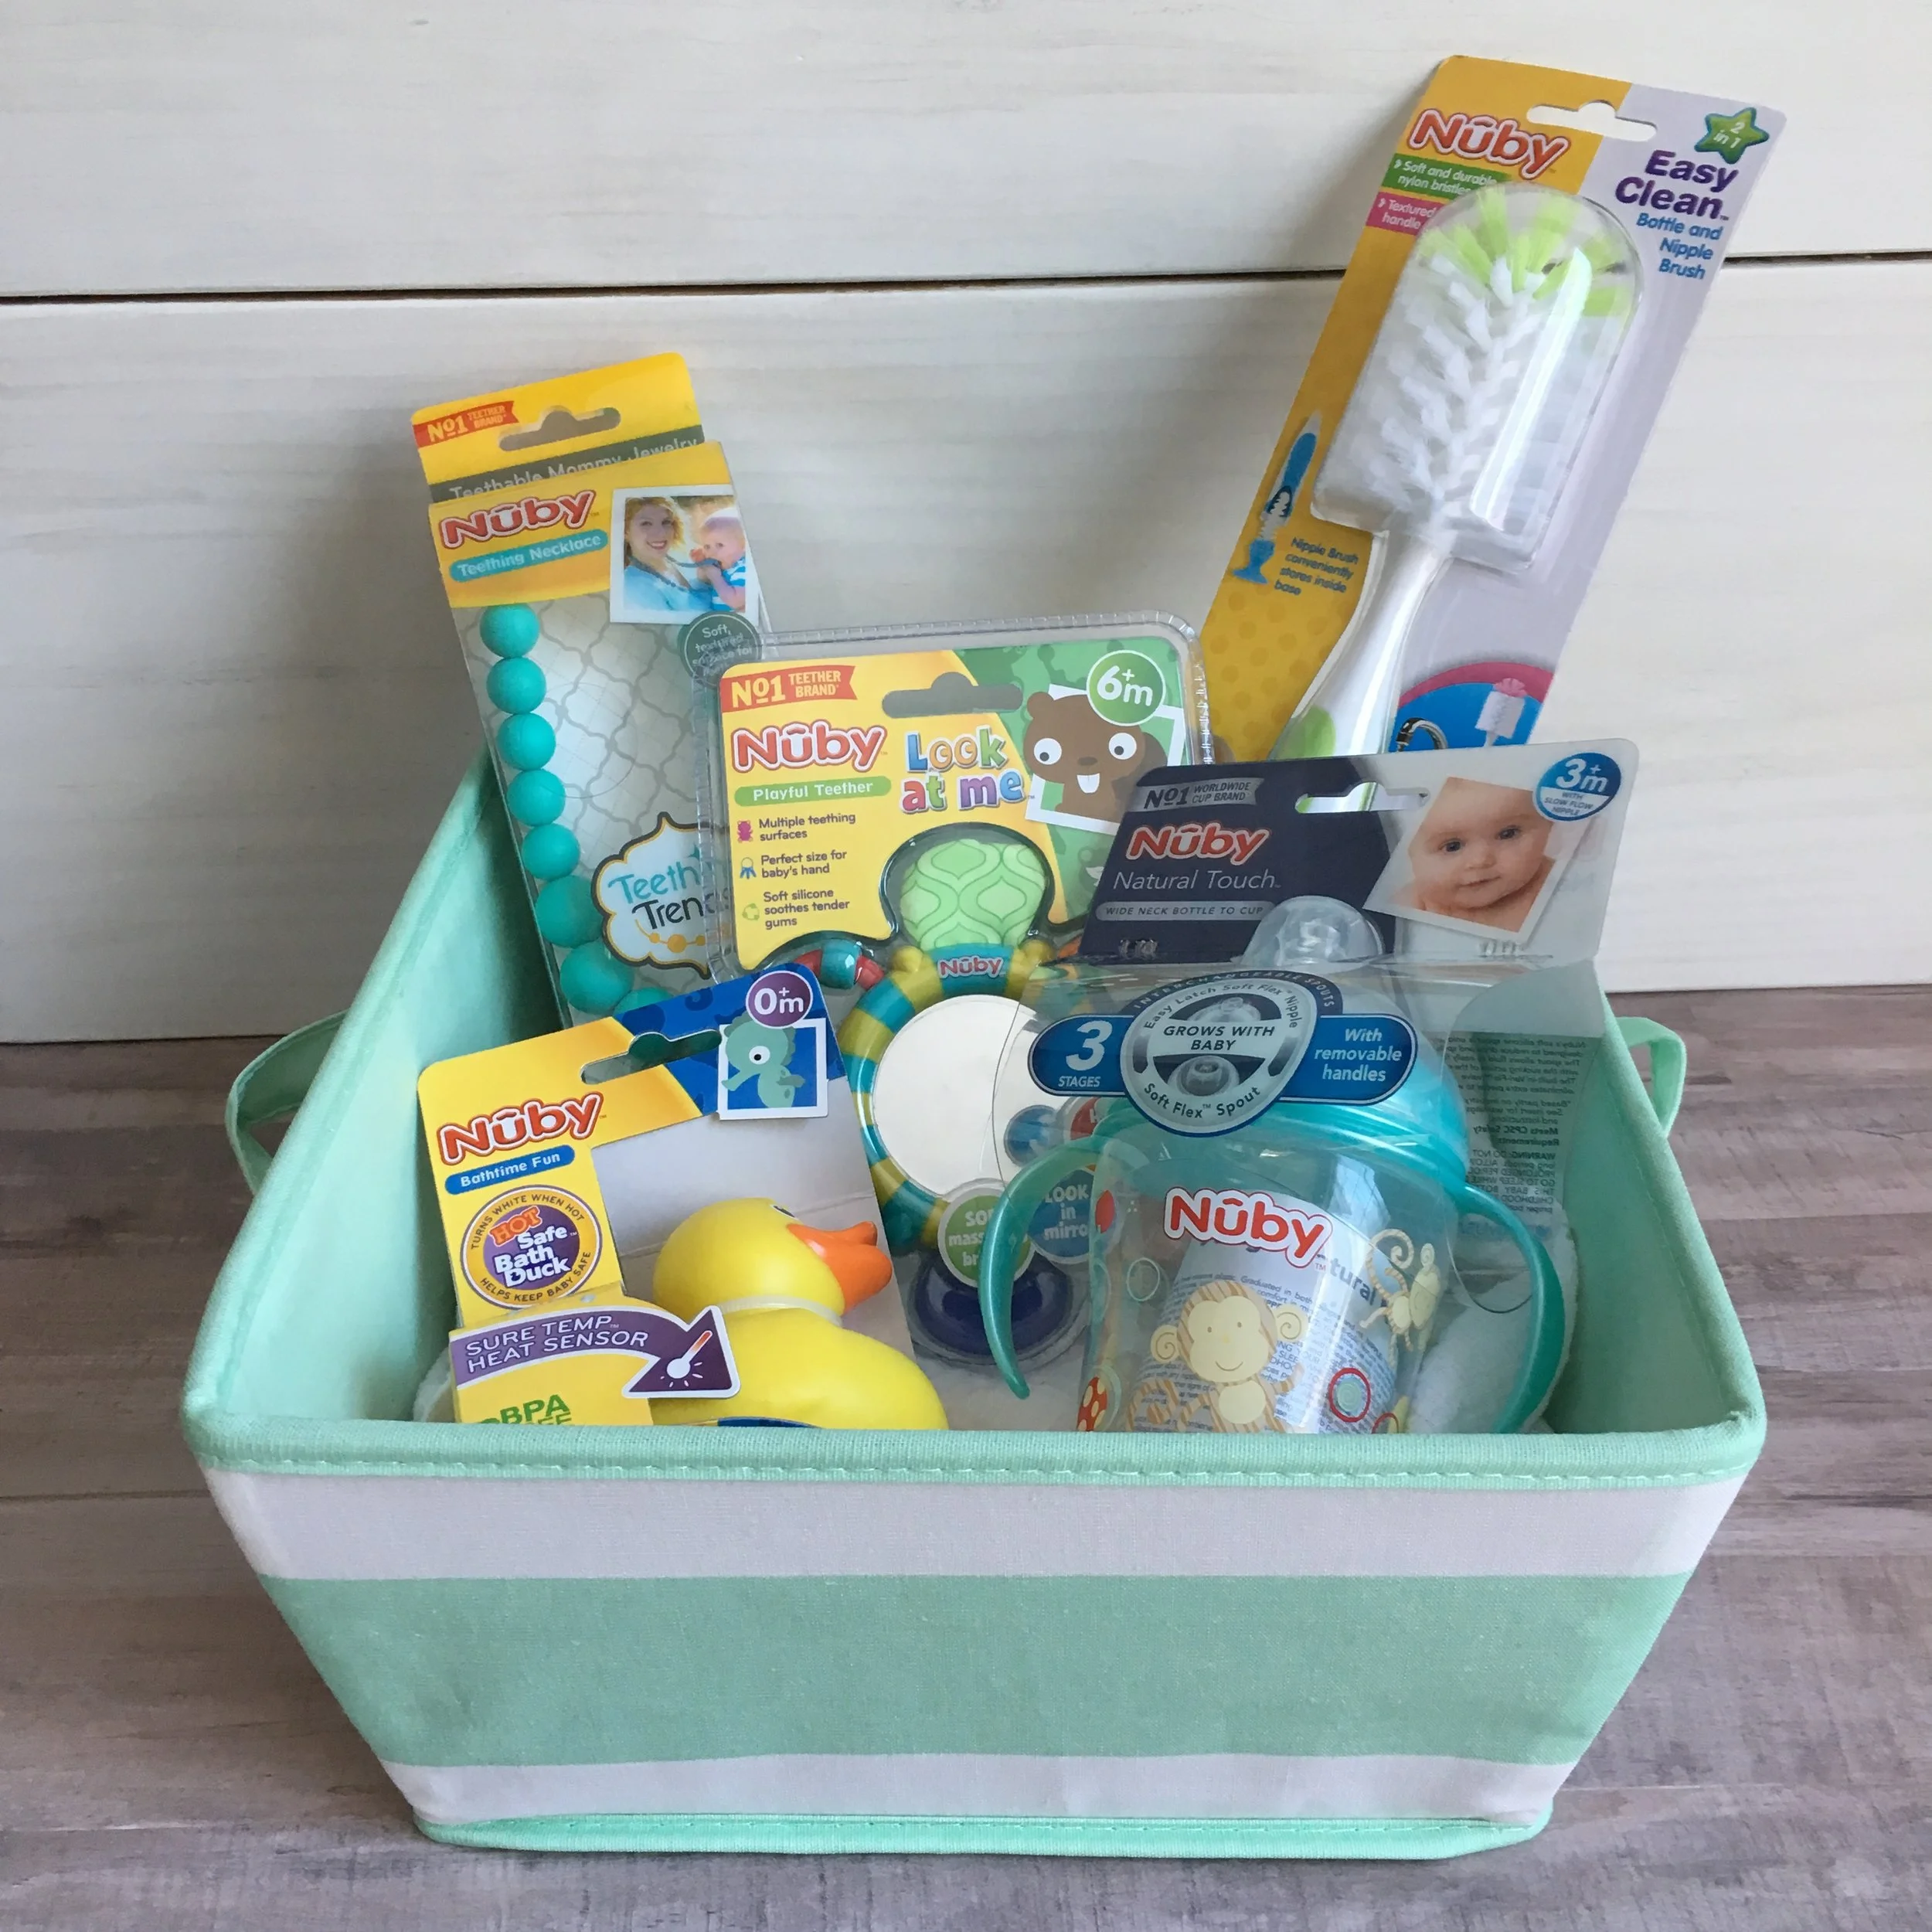
Sometimes it can be really hard to decide on an affordable baby shower gift for a friend, relative, or co-worker. Maybe you waited too long and all their registry items in your price-point have already been purchased (darn!), or maybe you're like me and like to go rogue and buy fun and practical items that weren't on their registry in the first place. In any case, you can't go wrong with gift baskets - and what better way to to fill a gift basket than with affordable, practical items from a great brand like Nûby. | Thank you to Nûby for providing the products to review for this post. This post contains affiliate links |
I had a hard time narrowing down exactly what Nûby products to include in this gift basket, but after some thought I decided to choose a variety of items that would be useful throughout baby's first six months and beyond. In the past, I've also done gift baskets in a particular theme (all bath items, or all feeding items, etc), and those are always a really fun option as well!
Hot Safe Bath Duck
This bath duck you can use from day one with your little one. He is BPA-free and has a super-handy heat sensor on the bottom so you know if the water temp is safe for your baby. I love that this duck is something you'll be able to use at every bath for a long time - as a temperature safety feature and as a fun bath toy.
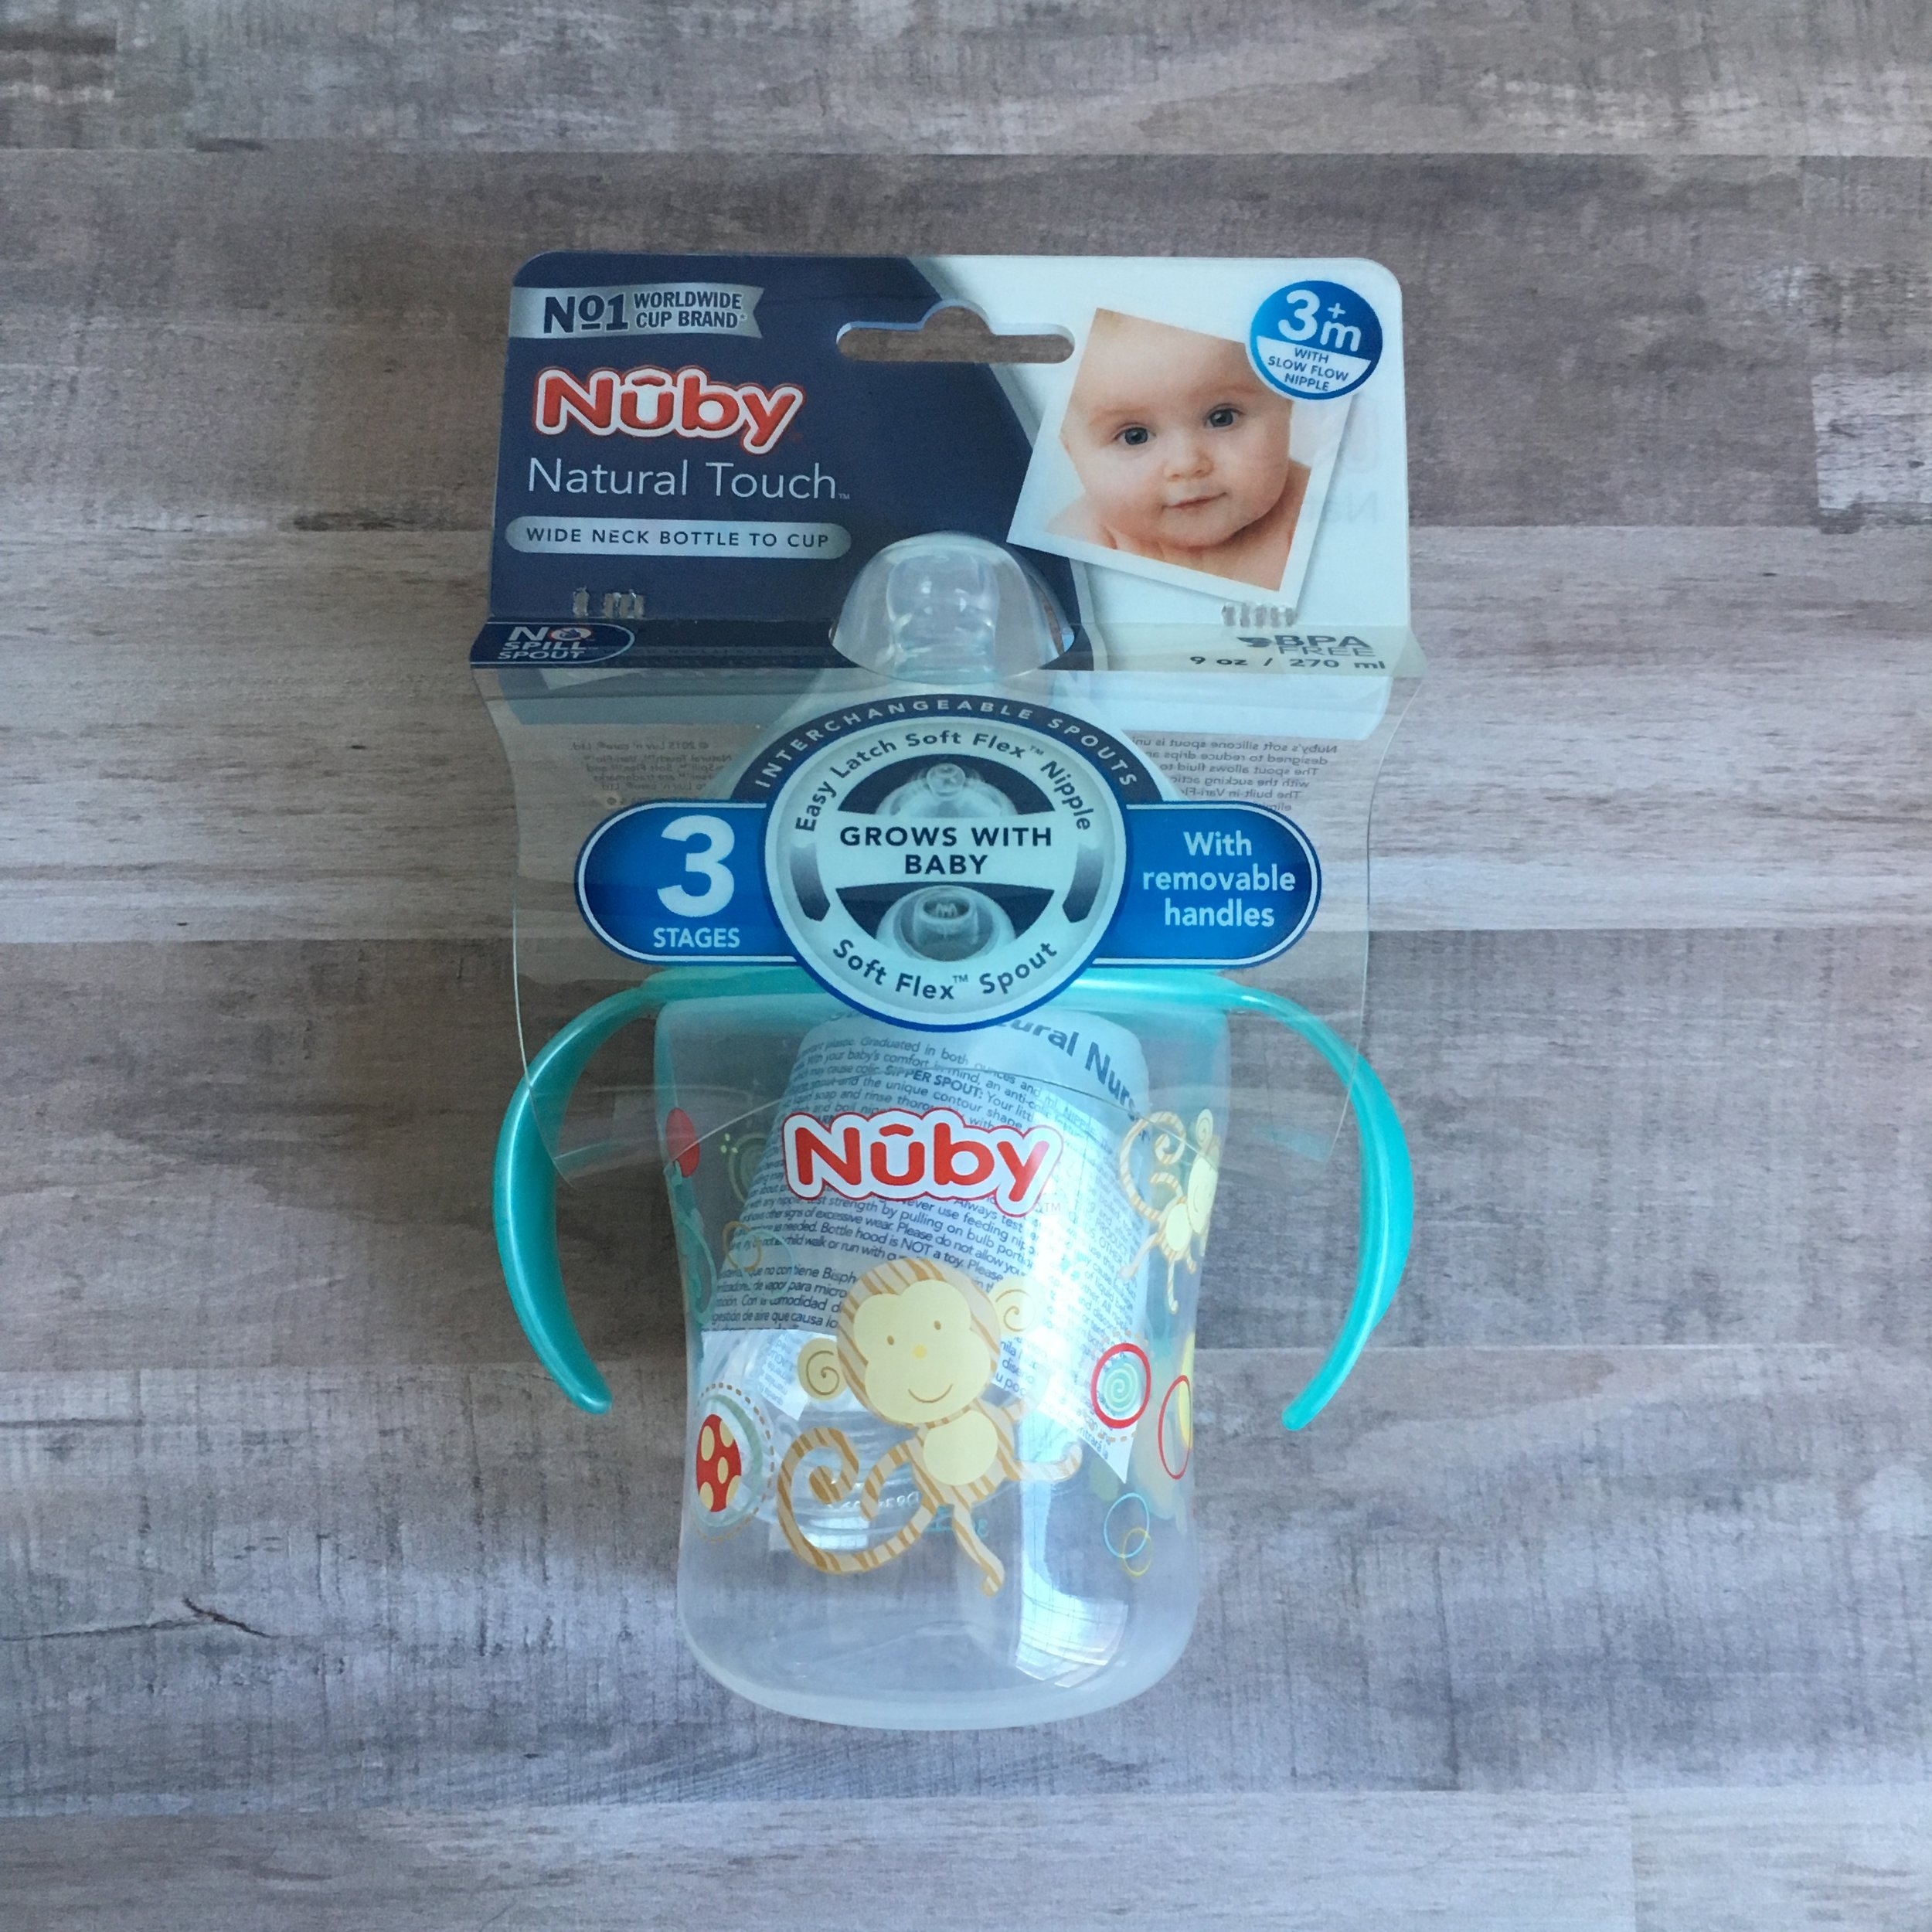
Nûby Natural Touch Bottle to Cup
If you've been following my blog for awhile, you know already that I am ALL about the baby products that grow with baby - if it's convertible, and you can get a lot of use out of it, that's the product I'm going to choose. This 3-stage, BPA-free cup is good from 3+ months and converts from a bottle with a slow-flow nipple to a no-spill sippy cup as your little one gets older. It even has detachable handles.
Look at Me Mirror Toy
This fun teether toy is BPA-free and recommended for babies 6+ months. It has multiple surfaces and textures to keep your little one occupied while they're teething, including cooling gel and a fun mirror to look at their reflection.
Easy Clean Bottle and Nipple Brush
This BPA-free bottle brush will come in handy from day one as well. It has a convenient suction base so it stands up on your counter and away from coming in contact with germs on the counter top. It also has a big bristly top for scrubbing inside bottles, and a handy nipple brush stored in the base to clean bottle and sippy cup nipples.
Teething Trends Pearl Beaded Necklace
And finally, it's always great to put something in that both mom and baby can use! This BPA-free, soft silicone necklace is fashion with a purpose - it makes a fun statement necklace for mom, but pulls double-duty as a wearable teether for your little one.
More affordable ideas to add to a baby shower gift basket:
thermometer
comb/brush set
package of wipes
nail clippers
rattle
diaper cream
pacifier
cute onesie
funny bib
board book
receiving blanket
baby bonnet
photo frame
- I received these items for review from Nûby but all opinions expressed are my own. Please see our Disclosure Policy for more information. -
These Nûby products can be found at various retailers including Babies 'R Us, Buy Baby Direct, Walmart, and Amazon.
Last Friday we decided at the last minute to spend the weekend in Ogunquit, Maine - the weather looked great, my husband was itching to take some Milky Way photos, and it had been too long since we did a little family trip. It was also right before "the season" starts, which meant that there would be less crowds and cheaper hotel rooms (yes!). All-in-all as a family of three we spent less than $175 for the whole weekend, including the hotel room, so I would call that a huge success!
For hotel we stayed at The Beachmere Inn which is conveniently located right on the Marginal Way, a 1.25 mile scenic walkway following the edge of the ocean. Even though we were calling for reservations the day before, The Beachmere thankfully still had a few rooms available. We opted for the least expensive one ($100+tax, which was this particular room's preseason rate). It was a nice, modest room with a queen sized bed in the Victorian building of the hotel complex. This room didn't quite have the view that most rooms at the hotel have, but we didn't mind since we knew we'd be out walking most of the day and then to bed early with our little one.
The Beachmere Inn
The view from our private balcony.
To save a little extra money we packed our lunches from home for that first day. We got to the hotel around lunch time and since our room was ready they let us check in early (very nice!). We were able to enjoy our lunch on our own private balcony overlooking the great lawn of the hotel.
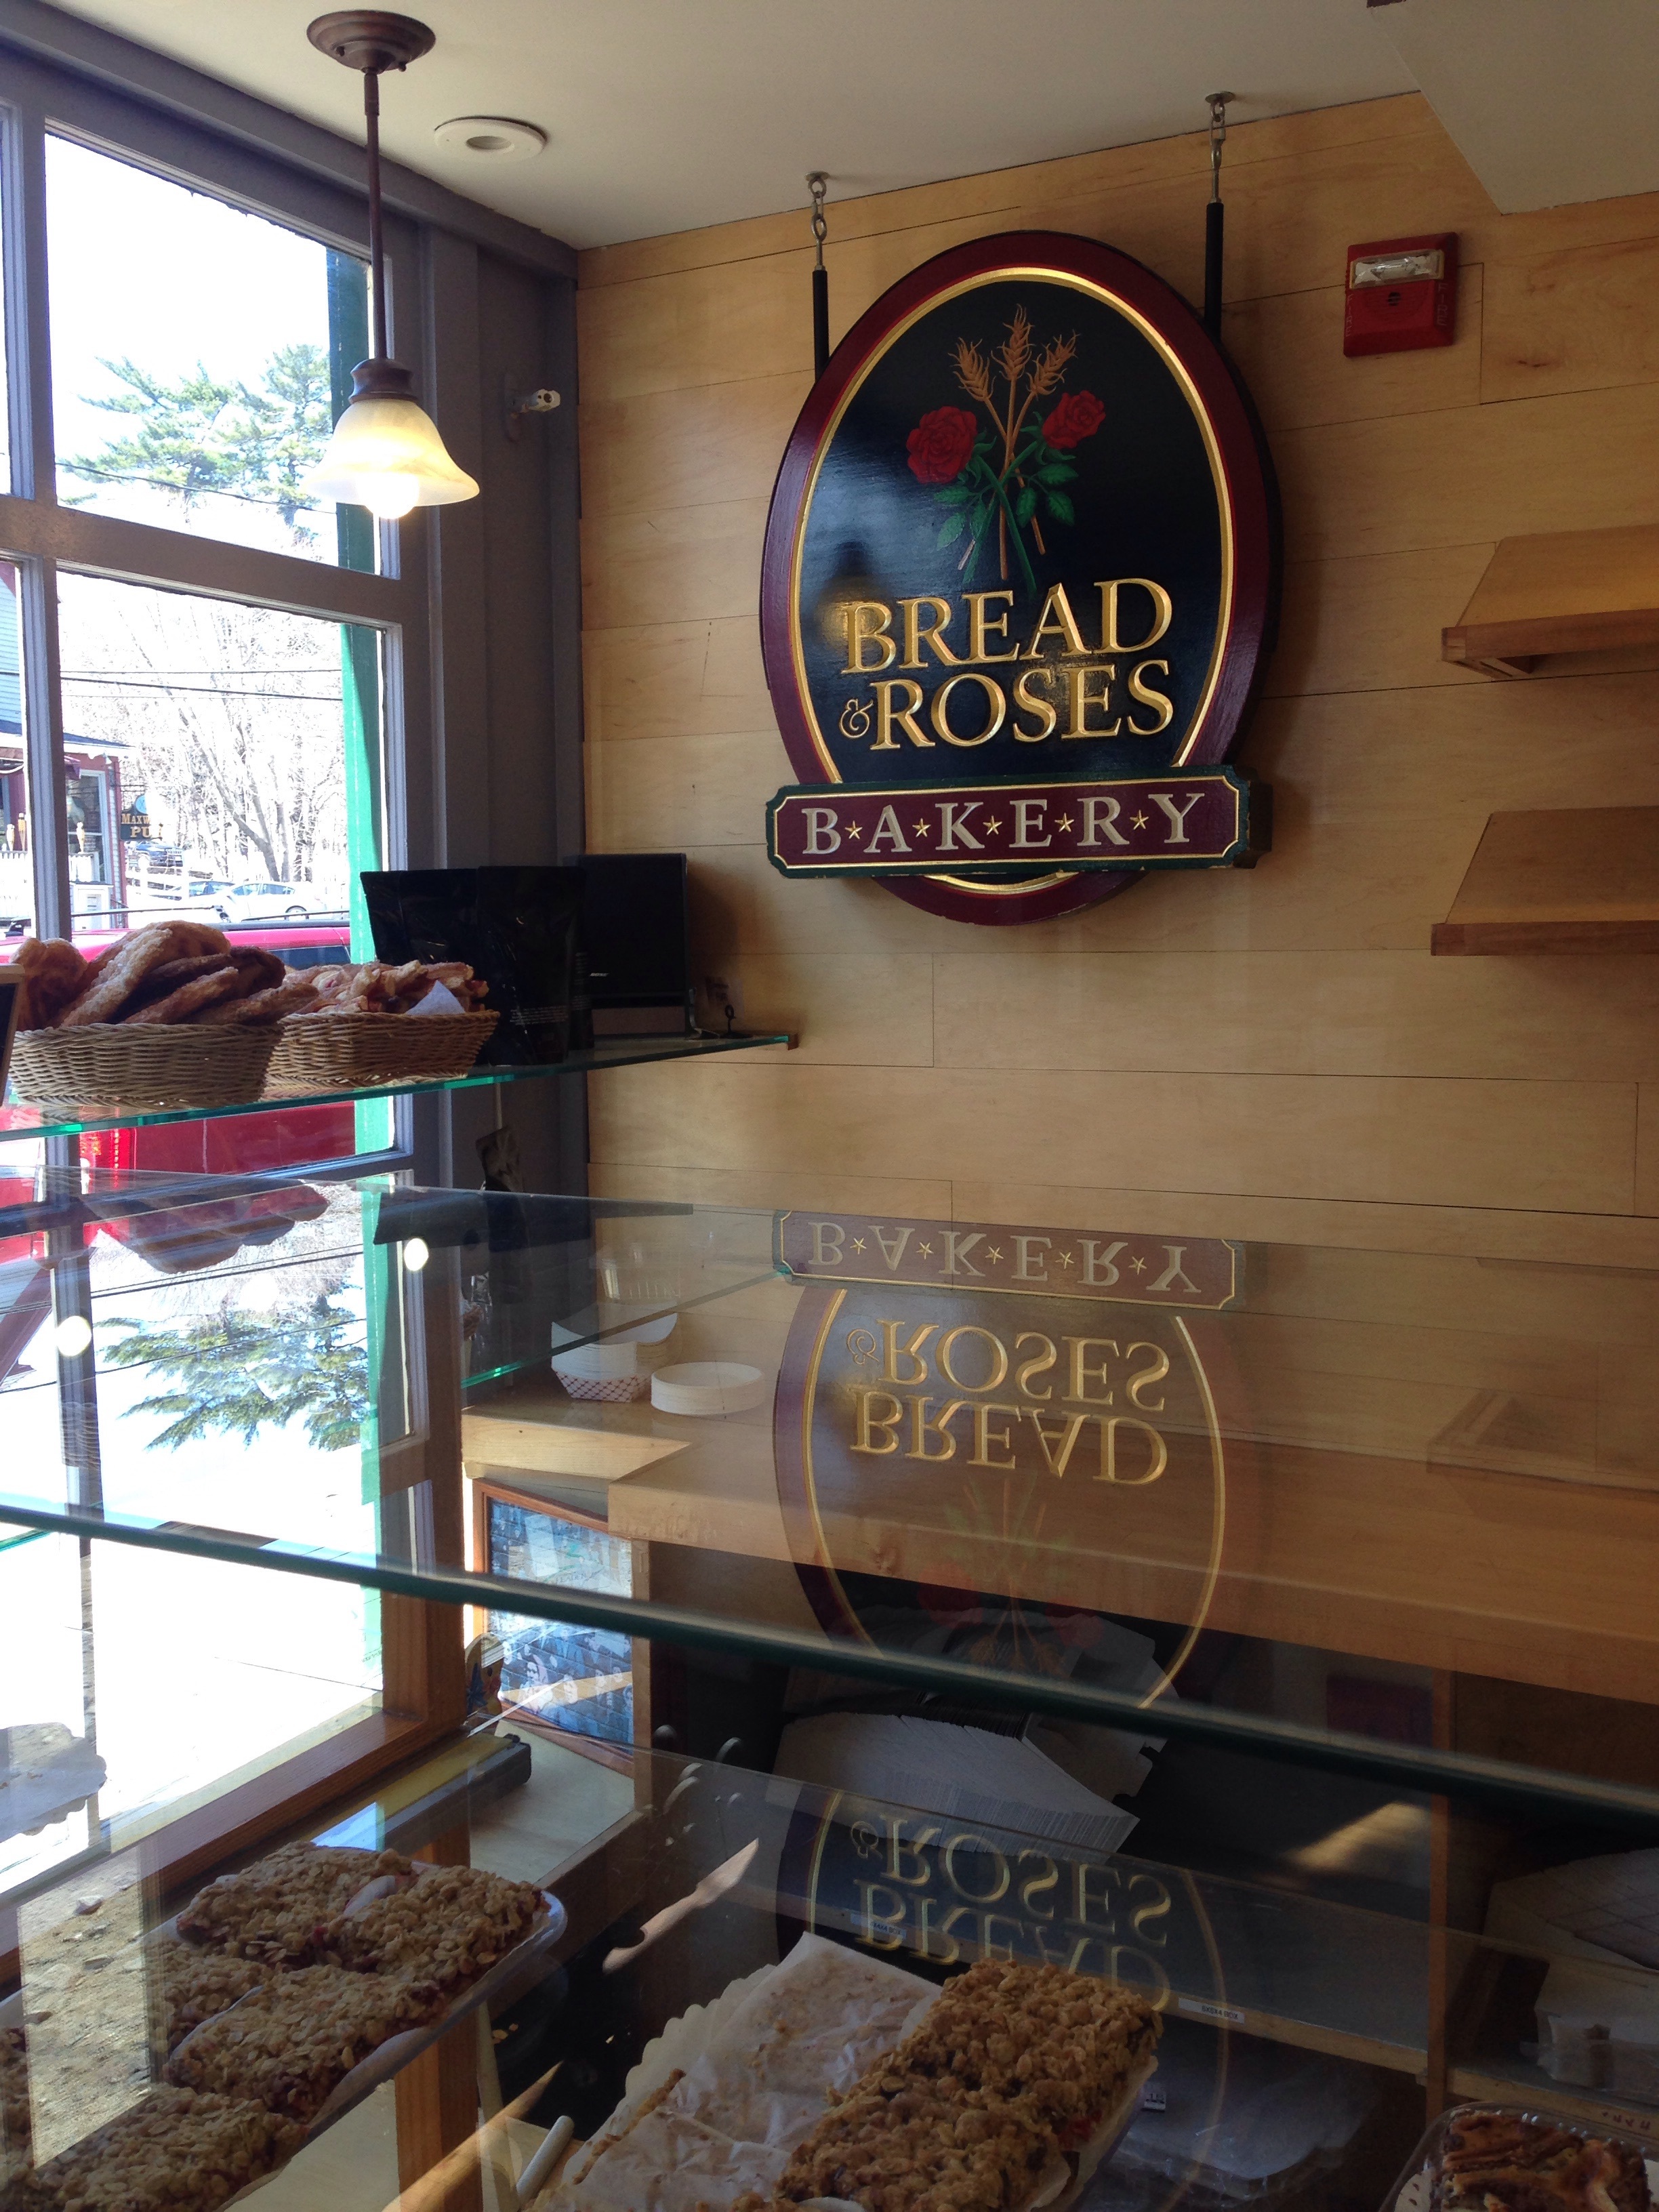
That afternoon was spent wandering up and down the Marginal Way and walking into town to explore some of the little shops and buy some delicious pastries at Bread & Roses Bakery. We highly recommend their Cinnamon Butter Puffs and our daughter was a big fan of the massive chocolate chip cookies bigger than her head (no surprise there).
Running along the ocean = perfection.
Mid-afternoon Daddy watched Miss M so I could get a training run in. I ran four miles along the Marginal Way and through the high-end coastal neighborhoods, and even did a short stretch of running in the sand on Ogunquit Beach. This run has to be the most fun and scenic I have done to date - why can't all runs be so pretty?
Dinner options in Ogunquit were a bit limited as it's still the "off season" (many seasonal businesses and seasonal rates start April 14th). So we opted to drive up the road a few minutes to the Moody Beach area and have dinner at Jake's Seafoodwhere we ate our weight in delicious fried seafood. The bill for the three of us came in at $40, which was a little more than we were expecting but splurging on fried food is pretty much a must-do of any seaside trip.
The views along the Marginal Way are breathtaking.
After dinner we went back to the hotel and played outside a bit before turning in early. Adrian was planning to get up at 3AM to capture some Milky Way shots as long as the weather cooperated. Luckily for him, the clouds held off and he was able to just walk off the hotel lawn and get some amazing Milky Way and sunrise shots (you can see more of his photos on his Instagram, @adrianpelletier).
The next morning we enjoyed a nice continental breakfast at the hotel. They had coffee, tea, cereal, bagels, fruit, and yogurt as well as selection of locally made donuts. (I had yogurt with granola and a very delicious Boston creme donut, because you know, balance.)
Bread & Roses Bakery - so much deliciousness!
After breakfast we walked back into town to do some last minute poking around and pick up more pastries from Bread & Roses to bring home, between our two trips here we spent about $20. Then we went to Ogunquit Beach to let our little one run around and play in the sand a bit. It was brisk but sunny and we pretty much had the whole beach to ourselves. After that we decided to check out a little early and head home to catch Miss M's nap, but if we had stayed in Ogunquit for lunch we would have grabbed some sandwiches from The Village Market, which looked yummy and reasonably priced and had a picnic on the beach or along the Marginal Way.
Overall it was a great, affordable weekend in Ogunquit. Lots of beautiful views, good food, exploring downtown, running and photo adventures, and, most importantly, some quality family time.
Today I thought I'd share what we'll be putting in our little one's Easter Basket. My goal was to spend less than $20 and fill it with practical and fun items. | This post contains affiliate links |
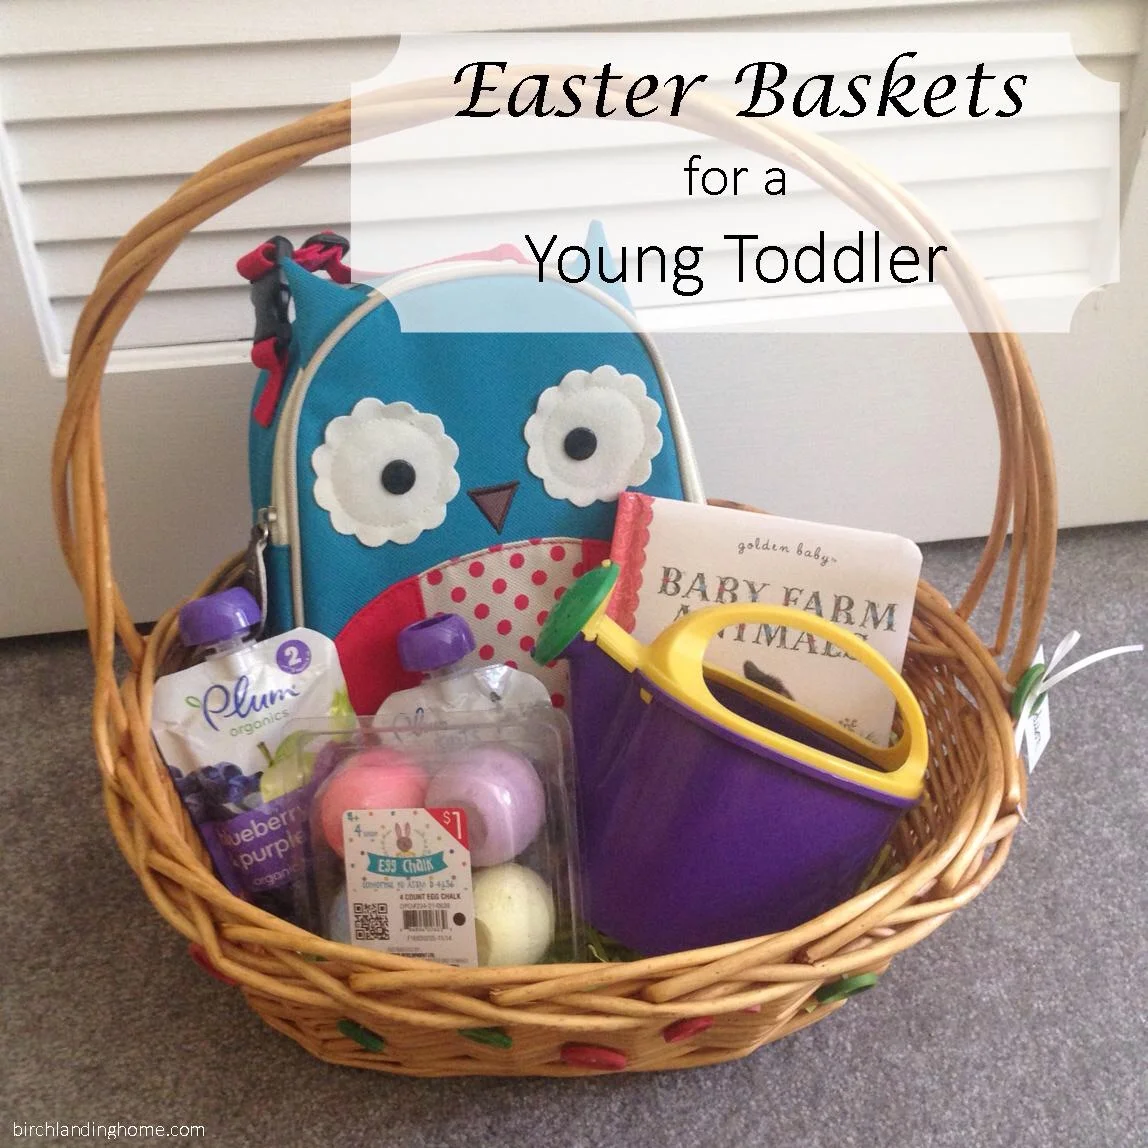
Our little girl is only 15 months old, has more than enough toys, and doesn't eat candy yet so I was a little stumped as to what to put in her Easter basket at first. After some thought I decided to fill it with some items she needed anyway and a few things to use outside once the warmer weather comes (someday soon, I hope).
I started with the Easter basket I made for her last year (you can read my post on making her Button Easter Basket here). First I filled the bottom with paper Easter grass - having a toddler and a dog, it's so important to use the paper Easter grass over plastic just in case any gets eaten. The paper grass is also a lot more eco-friendly.
I love what I found to put in her basket!
In her basket:
Owl Lunchbox by SkipHop. She desperately needed a new lunchbox (hers broke) and this owl one from Amazon was just the cutest. There are many other animal styles to choose from too if owls aren't your thing.
Purée pouches by Plum Organics. What toddler doesn't love snacks? We picked these up last time we were at Target but they can be found at just about any grocery store or purchased by the case from Amazon.
Baby Farm Animals board book by Golden Books. We actually got this book for free from the local library (they were clearing out duplicates) but you can usually find inexpensive board books on Amazon or on sale at your local book store.
Child's Watering Can. We got this from the Dollar Store, but these can also be found at your local pharmacy. (Similar one here.)
Egg-Shaped Chalk. These came from the dollar bins at Target, and I love them because they're easy for little hands to hold. (Similar ones here.)
Since I got the board book for free I spent right around $15 for everything - wahoo!
Other basket ideas for a one-year old or young toddler:
All of these items can be done for a girl or a boy, and are easy to tweak if you wanted to tailor it more to your own child. I hope I've given you some ideas of what to put in your little one's Easter basket - Happy Easter!
Looking for more Easter ideas? Check out our other Easter posts: